

Passwords have a habit of finding their way into places where they should not be.
- An Excel workbook containing service accounts.
- A project handover document with an admin password.
- A script containing an API key.
- A configuration file with a connection string.
These are not password-protected files. They are normal files where somebody has written a password, username, API key, token or another credential directly into the content.
Microsoft Purview already has built-in credential detection that can help us find this type of data.
And importantly, if the objective is simply to find these files, we do not need to start by creating a DLP policy.
We can start with Data Explorer.
Let’s take a look.
Credential detection in Microsoft Purview
Microsoft Purview includes a number of built-in Sensitive Information Types, usually shortened to SITs, specifically designed to identify credential patterns.
A good starting point is All Credential Types.
This is a bundled Sensitive Information Type that includes detectors for things such as:
- General passwords
- User login credentials
- Microsoft Entra credentials
- Client secrets
- API keys
- Access tokens
- Connection strings
- Shared access signatures
- Service-specific credentials
There are also individual credential SITs including:
- General Password
- User Login Credentials
- Microsoft Entra user Credentials
- Microsoft Entra Client Secret
- Azure SQL Connection String
- Azure DevOps Personal Access Token
- GitHub Personal Access Token
- Client Secret / API Key
This means we can start broad and then narrow the search down if required.
There is an important limitation
Before going any further, there is something worth understanding.
Purview is not a magic password scanner.
It does not simply look through every document and somehow know that a random piece of text is a password.
The credential Sensitive Information Types use supported patterns, keywords and contextual evidence to identify credentials.
For example, something structured like:
username=admin;password=SomePassword
is much more aligned with the documented credential detectors than somebody writing:
The password for the old system is bluechair
Microsoft also documents that the General Password Sensitive Information Type uses English-only password-related keywords.
So this approach can help identify credentials, but it should not be treated as a guarantee that every password somebody has ever written into a document will be found.
Step 1: Test the credential Sensitive Information Type
Before searching production data, it is worth seeing how the credential detection actually works.
In the Microsoft Purview portal:
- Go to Information Protection.
- Select Classifiers.
- Select Sensitive info types.
- Search for All Credential Types.
- Open the Sensitive Information Type.
- Select Test.
- Upload a test file containing fake credential values.
- Review the results.
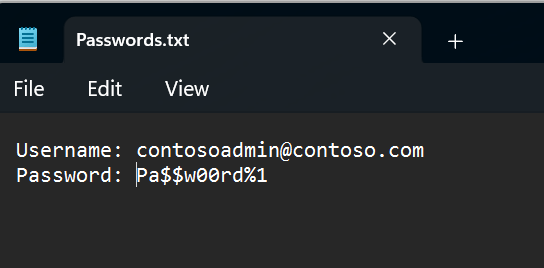
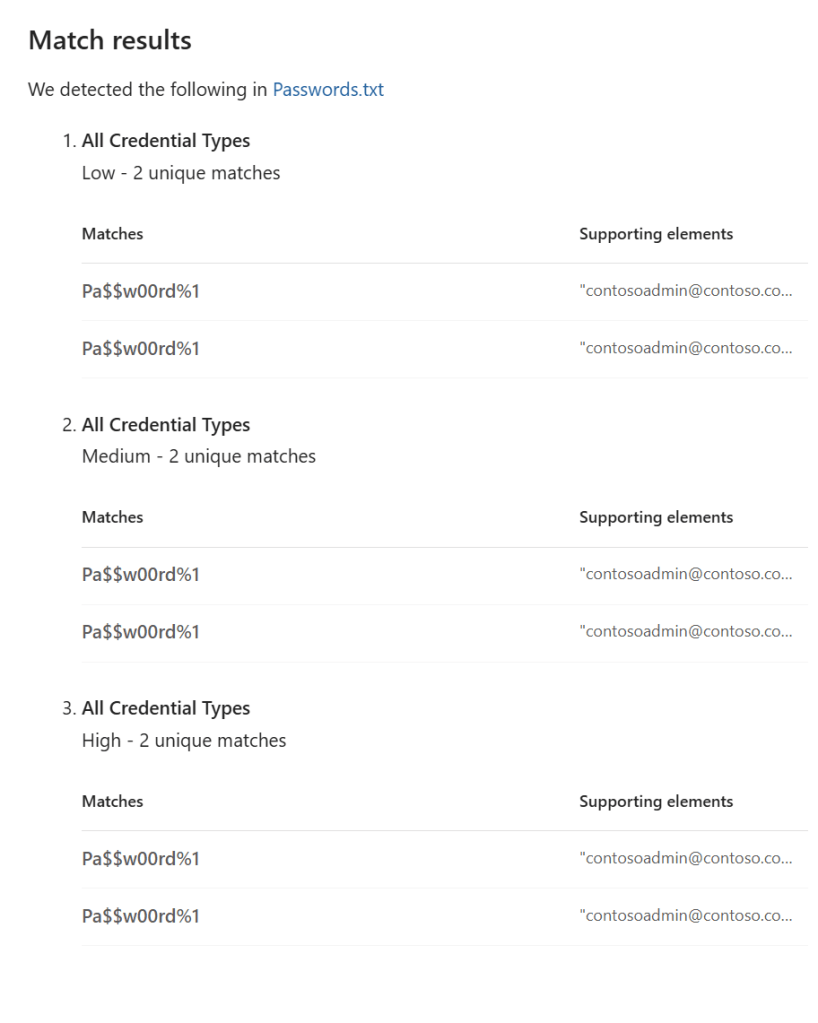
I would create a few simple test files containing things such as:
- A fake username and password
- A password assignment in a script
- An XML configuration containing a password
- A fake API key
- A fake connection string
- Normal business text that should not match
Do not use real credentials for testing.
The idea here is simply to understand what Purview is capable of detecting before looking at production data.
Step 2: Open Data Explorer
Now we can see what Purview already knows about the data.
In the Microsoft Purview portal:
- Go to Solutions.
- Select Information Protection.
- Select Explorers.
- Select Data Explorer.
Data Explorer provides visibility into content that Purview has classified using things such as Sensitive Information Types and sensitivity labels.
Rather than creating another policy just to discover the data, we can use the classification information that Purview already has.
Step 3: Search for credential information
Within Data Explorer, search for the credential Sensitive Information Type.
A good place to start is:
All Credential Types
This gives us the broadest view of content that Purview has classified as containing supported credential patterns.
From there, we can start drilling into the results.
For example:
All Credential Types
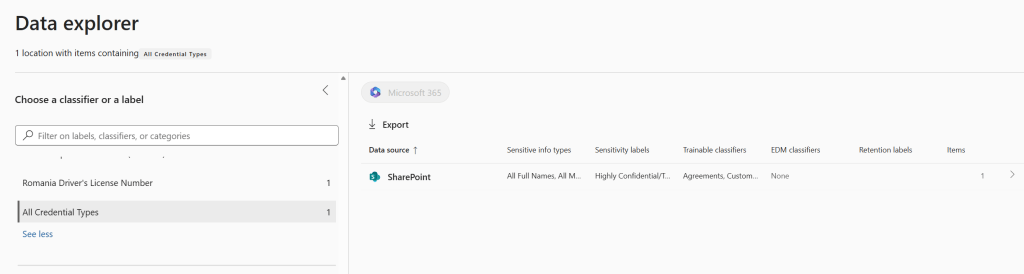
Then: SharePoint
Then: Site
Then: Folder
Then: File
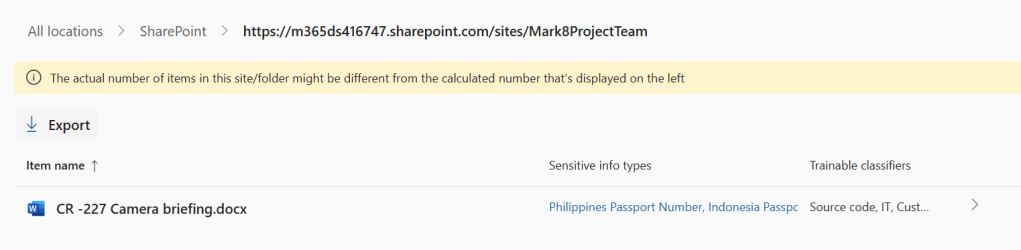
The same approach can be used with OneDrive.
This gives us a way of working from the classification down to the actual location of the file.
Step 4: Narrow the search
All Credential Types is useful for the initial discovery because it covers a large number of credential types.
But sometimes we might want to be more specific.
Instead of searching for everything, we could search for individual Sensitive Information Types such as:
General Password
or: User Login Credentials
Or perhaps we are specifically interested in secrets used by applications: Microsoft Entra Client Secret
Or development credentials: GitHub Personal Access Token
Or database credentials: Azure SQL Connection String
This is where the built-in credential Sensitive Information Types become really useful.
We can start broad and then narrow the investigation depending on what we find.
Step 5: Investigate the files
Once we have identified a file, the next step is to determine whether the match represents a genuine credential.
There are separate permissions within Purview for this.
The Data Explorer List viewer role allows an administrator to see items and their locations.
The Data Explorer Content viewer role provides additional access to the content of those items.
That second permission is obviously sensitive.
If somebody can investigate files containing credentials, they may potentially be able to see the credential itself.
Access to this capability should therefore be limited to the people who genuinely need it.
There is another limitation worth knowing about.
Credential scanning classifiers do not currently support:
- Contextual summary
- Redacted preview
- Match feedback
- Not a Match feedback
That means credential matches need to be investigated carefully.
Step 6: Remediate what you find
Finding the file is only the start.
If a genuine credential is discovered, a remediation process could look something like this:
- Confirm that the match is a genuine credential.
- Identify the system or service associated with it.
- Rotate or revoke the credential.
- Remove the credential from the document.
- Replace it with an approved reference to a secrets-management platform.
- Review who had access to the file.
- Investigate relevant activity if required.
The important part here is rotate or revoke the credential.
Simply deleting the password from the document does not mean the credential has not already been seen or copied.
What about DLP?
This is where I think the distinction becomes important.
If the requirement is:
“Show me files that Purview has identified as containing credentials.”
Start with Data Explorer.
There is no need to create a DLP policy just to perform that discovery.
But once we have established that credentials are being stored in documents, the next question becomes:
How do we stop this happening again?
That is where Data Loss Prevention becomes useful.
A DLP policy can use the same credential Sensitive Information Types as conditions.
For example:
Content contains > Sensitive information types > All Credential Types
The policy could then be used to:
- Generate alerts
- Notify users
- Display policy tips
- Monitor activity involving the content
- Apply restrictions where appropriate
So I see the two capabilities as solving slightly different problems.
Data Explorer helps us understand what is already there.
DLP helps us introduce controls around what happens when that type of data is detected.
Taking it further with DLP
Once the initial discovery has been completed, a custom DLP policy could be created.
In the Microsoft Purview portal:
- Go to Solutions.
- Select Data Loss Prevention.
- Select Policies.
- Select + Create policy.
- Select Custom.
- Create a Custom policy.
- Select the required locations.
- Create an advanced DLP rule.
- Add the condition Content contains.
- Select Sensitive info types.
- Add All Credential Types or the individual credential SITs required.
I would start any new policy in simulation mode.
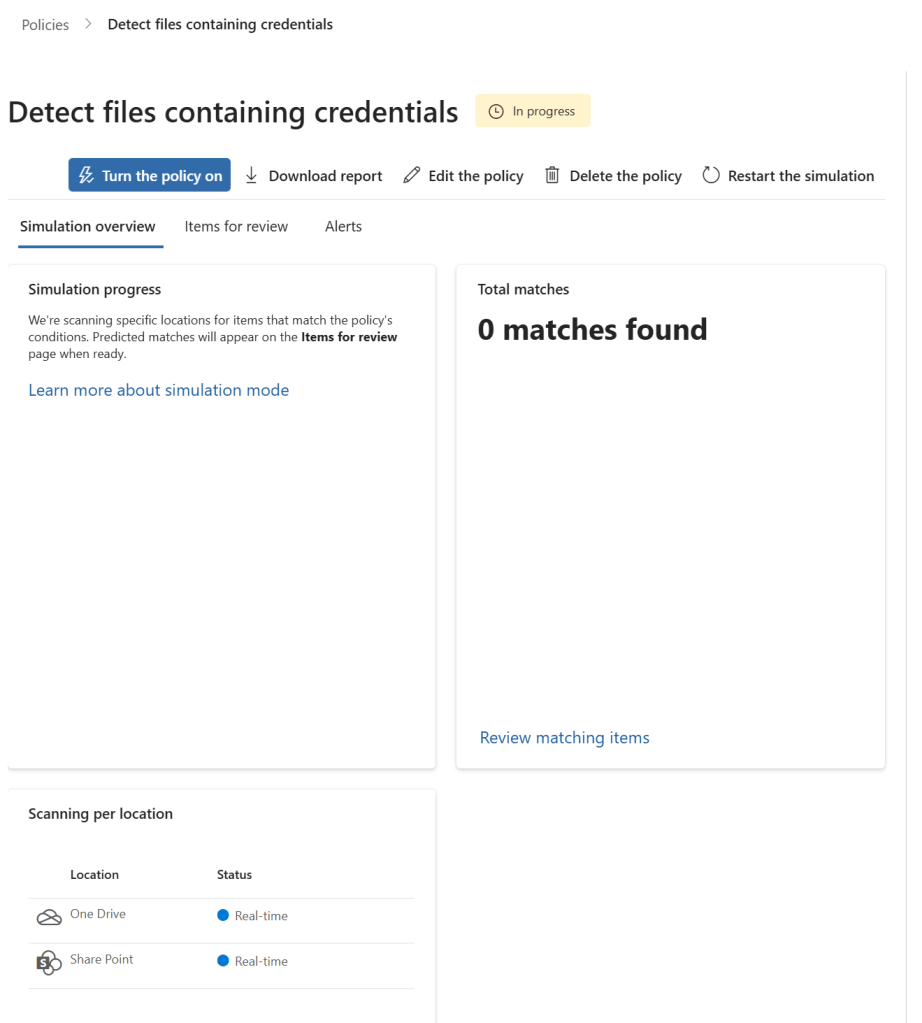
This allows the policy conditions to be evaluated before introducing enforcement.
Once the results have been reviewed, the policy could then be tuned and appropriate alerts, notifications or restrictions introduced.
Advanced classification scanning and protection must be enabled when credential scanning Sensitive Information Types are used with Endpoint DLP.
This can be configured from:
Data Loss Prevention > Overview > Data loss prevention settings > Endpoint settings > Advanced classification scanning and protection
The Devices location can then be included within the DLP policy.
- Go to Solutions.
- Select Data Loss Prevention.
- Select Policies.
- Select the existing DLP policy and select Edit policy.
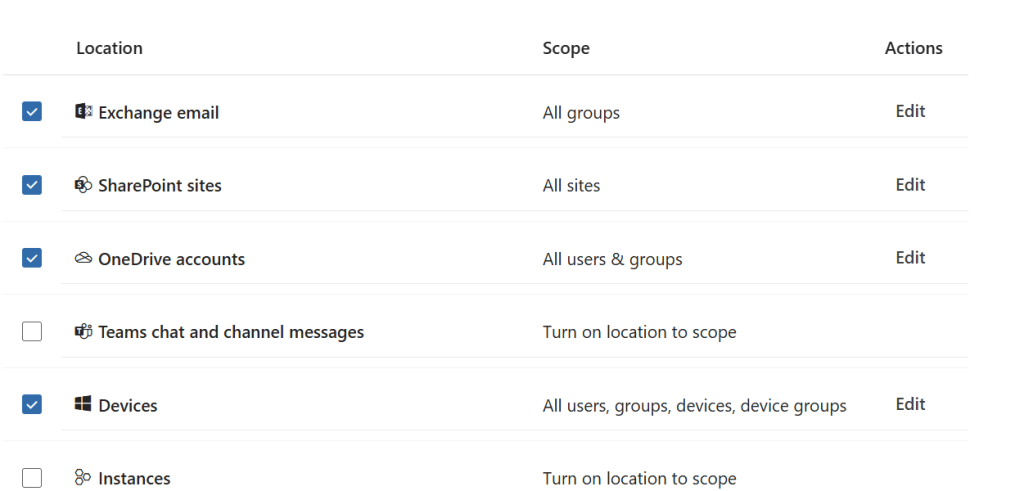
- Ensure Exchange email, SharePoint sites, OneDrive accounts and Devices are selected as locations.
- Edit the existing advanced DLP rule containing All Credential Types or the individual credential sensitive information types.
- Add the condition Content is shared from Microsoft 365 and select with people outside my organization.
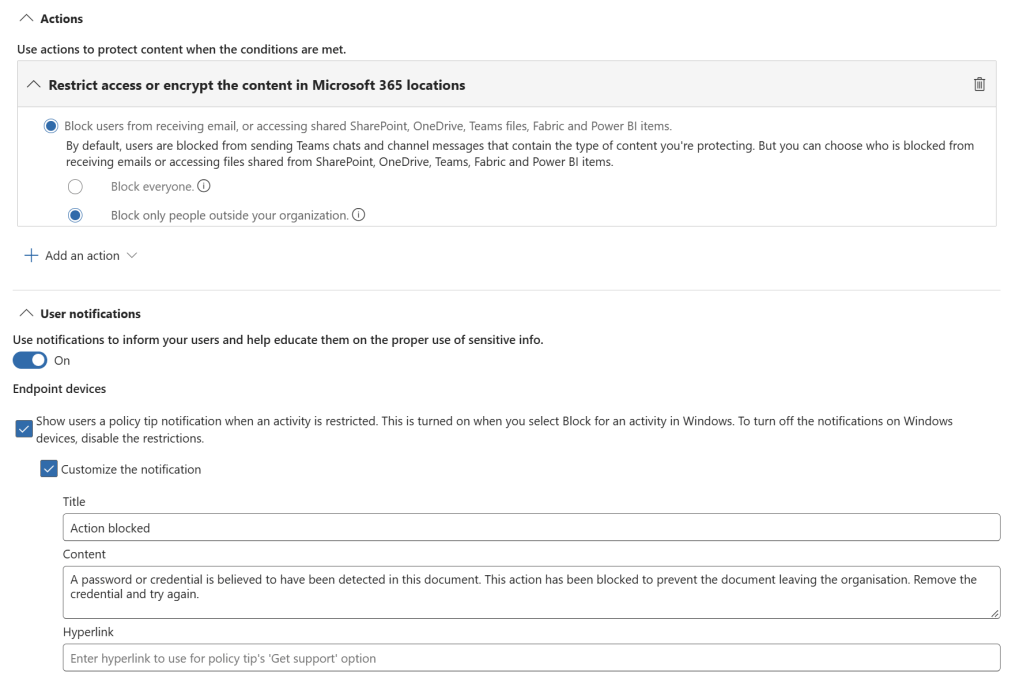
- Under Actions, select Restrict access or encrypt the content in Microsoft 365 locations.
- Select Block users from receiving email or accessing shared SharePoint and OneDrive content.
- Select Block only people outside your organization. This prevents the document being sent externally through Exchange or shared externally through Teams, SharePoint or OneDrive.
- Set User notifications to On.
- Enable Notify users in Office 365 services with a policy tip.
- Customise the policy tip with a message such as: A password or credential is believed to have been detected in this document. This action has been blocked to prevent the document leaving the organisation. Remove the credential and try again.
- Ensure User overrides are not enabled so the user cannot bypass the restriction.
- Under Incident reports, enable Send an alert to admins when a rule match occurs.
- Add the required administrators or security team under Send email alerts to these people.
- Create a separate advanced DLP rule for Devices using the same credential sensitive information types.
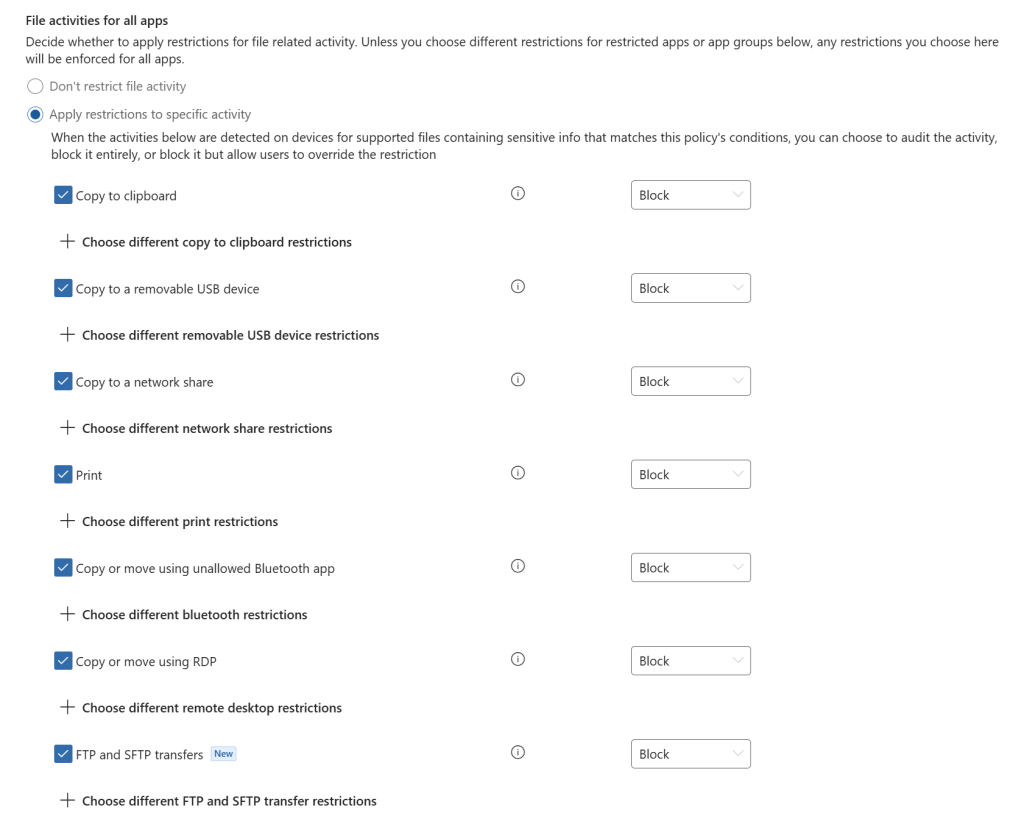
- Under Actions, select Audit or restrict activities on devices.
- Set supported exfiltration activities such as uploading to restricted cloud services, copying to removable USB devices, copying to network shares, printing, copying to the clipboard, transferring through restricted applications, Bluetooth and RDP to Block.
- Enable User notifications for the endpoint rule and use the same credential-detection message.
- Configure the endpoint rule to send an alert to the required administrators when the rule is matched.
- Save the rules and select Turn the policy on immediately.
- Test the policy by attempting to send the document to an external Exchange recipient, share it externally through Teams and transfer it using the configured endpoint activities.
- Confirm that the transfer is blocked, the user is informed that a credential may have been detected and the administrator receives the DLP alert.
The important thing is that DLP comes after we understand the problem, rather than creating a DLP policy simply because we want to search the data.
Licensing
An E5 licence is required to use credential scanning Sensitive Information Types.
This is worth checking before planning the solution.
Summary
There are really two parts to this.
Finding the problem
Use the built-in credential Sensitive Information Types with Data Explorer.
A simple starting point is:
All Credential Types > SharePoint / OneDrive > Site > Folder > File
Then investigate the matches and remediate genuine credentials.
Preventing the problem
Once we understand what is being stored and where, we can introduce Data Loss Prevention using the same credential Sensitive Information Types.
That gives us the ability to move from simply discovering credentials to alerting, educating users and potentially restricting what can happen when credentials are detected.
So the approach becomes:
- Test the credential Sensitive Information Types.
- Use Data Explorer to see what Purview has already classified.
- Search using All Credential Types.
- Narrow the investigation using individual credential SITs where required.
- Investigate genuine matches.
- Rotate or revoke exposed credentials.
- Remove credentials from the files.
- Consider DLP if ongoing monitoring or prevention is required.
Sometimes the simplest place to start is not another policy.
It is looking at what Purview already knows about your data.
Note: When configuring DLP policies, keep in mind the service limitations of Purview. Particularly the 2 million character scanning limit for file content. If your environment has many files like this, consider deploying auto labelling policies based on file criteria that is likely to occur earlier in the file, then targeting DLP policies at the labels.

