In 2022, Microsoft added the Universal Print policy CSP to the Intune settings catalog. This replaced the Universal Print Printer Provisioning Tool and brought about a significant time saving when configuring Universal Print deployment policies.
When the Intune policy is sync’d with a device and a user logs in, the upprinterinstaller.exe runs to set up the printer for the user. Unfortunately, this does not run silently, instead displaying a popup for the user as pictured below:
My testing showed that this occurs on both Windows 10 and Windows 11 (edit 31st July 2024: Microsoft say they have fixed this in Windows 11 but I have not tested this since then). Each printer you deploy gets its own individual popup. So if you are deploying lots of printers, expect to see lots of popups. Combining multiple printers in to a single policy did not reduce the number of popups.
They stay on the screen for between 2 to 20 seconds depending on the device’s resource load. I’ve found that when I’ve misconfigured the deployment settings, the popup stays for up to a minute before exiting (presumably timing out).
In all instances, no user interaction is required. It always closes itself and no messages are displayed on the popup other than the .exe name.
Back in November, Microsoft acknowledged this popup as an issue they are investigating but have not provided any further update. It still does not feature on the Universal Print known issues list.
In this post I will cover what Windows Sandbox is, why it is still a valuable tool and how to get started with it.
Overview
I’ve been speaking to a number of IT professionals and many have either never used Windows Sandbox or even heard of it.
Microsoft introduced the Windows Sandbox feature in Windows 10 1903, so it has been around for quite a while. Microsoft sought to overcome the issue of how you quickly test software on a device without the need to buy a second workstation or deploy Virtual Machines.
Windows Sandbox is a Virtual Machine with a twist.
When it boots it creates a a sandboxed Windows environment.
It securely reads many of the host’s system files to support the VM.
When you shut it down, it destroys itself. Leaving nothing behind.
You can copy and paste to it and it has internet access by default.
In the most recent Windows 11 builds, you can now restart the Sandbox and it will retain its state. Shutting it down still destroys the VM.
This makes it an ideal tool for quick test and dev work.
Prerequisites
Windows 10 Pro, Enterprise or Education build 18305 or Windows 11 (Windows Sandbox is currently not supported on Windows Home edition)
AMD64 or (as of Windows 11 Build 22483) ARM64 architecture
Virtualization capabilities enabled in BIOS
At least 4 GB of RAM (8 GB recommended)
At least 1 GB of free disk space (SSD recommended)
At least two CPU cores (four cores with hyperthreading recommended)
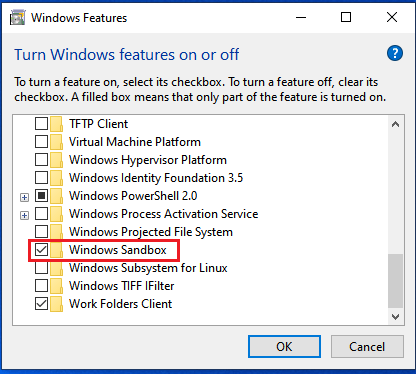
How to Enable Windows Sandbox
A simple tick box is all that is needed!
From the Windows desktop, select Start and type “features“
From the results, select Turn Windows features on or off.
Scroll to the bottom of the Windows Features window and tick Windows Sandbox.
When prompted, restart the device.
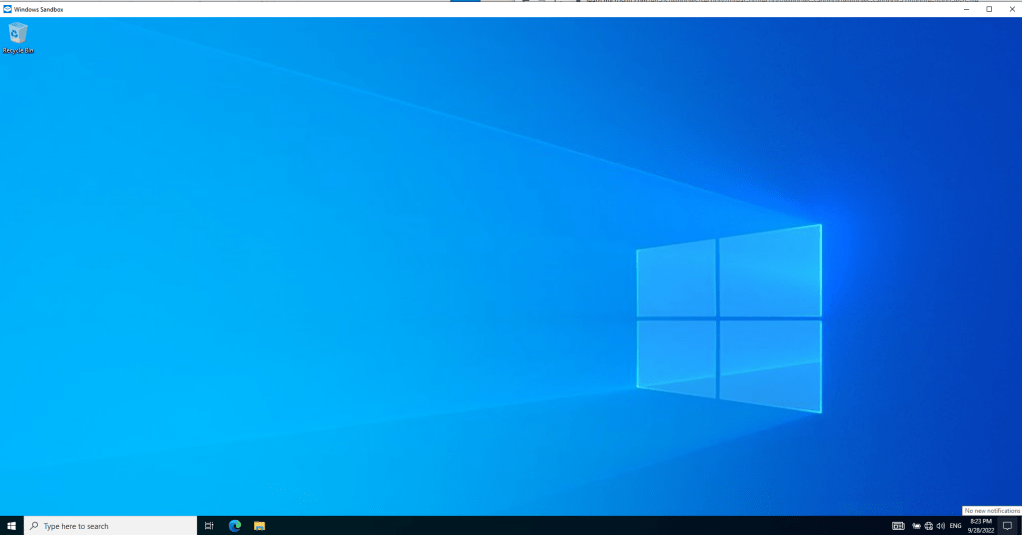
Explore Windows Sandbox
Once enabled and following the restart, you can now find Windows Sandbox in the Start Menu.
Clicking it will launch a brand new virtual machine running Windows. There is no need to login and you already have admin rights.
Out of the box you can:
Browse the internet (keep in mind, you can also browse the local network!)
Copy and Paste through the console
Run Powershell and Powershell ISE consoles
Install software
You cannot:
Update Windows
Make any persistent changes
Turn Windows features on or off
Browse the Microsoft Store
Add additional disks to compliment the 40GB system disk.
Note: The VM shares some system files with the host Operating System. Although the Settings app may show an older feature update of Windows in use (in Windows 10 it says 2004), in fact it is running whichever feature update version you currently have. See point number 2 in the comment below from Paul Bozzay, a Microsoft developer familiar with Windows Sandbox:
Save the file with a name of your choice and with the file extension .wsb
For example: Sandbox-8GB-NoNetworking.wsb
You will notice that the file icon will change to the Windows Sandbox icon as long as Windows Sandbox has been enabled.
Open the file to boot a Windows Sandbox VM with 8GB memory and networking disabled.
To close it, select the X at the top right or shut down the VM via the Start Menu within the VM itself.
Conclusion
Windows Sandbox provides a fast way to test software and is easy to set up. One draw back is that in the Windows 10 version, you cannot test software that requires a restart because restarting will destroy the state of the VM. You can overcome this by using Windows 11’s Windows Sandbox implementation.
If you are using it to test untrusted files then it is important that you understand how the VM interacts with the host Operating System. I recommend reading the Windows Sandbox architecture deep dive from Microsoft here:
Microsoft Endpoint Configuration Manager Current Branch 2103 now combines the ease of Windows 10 Servicing with the versatility of Task Sequences.
The Windows 10 Servicing node in ConfigMgr has been around for some time however many organisations have not been able to rely on it solely for workstation upgrades. Frequently Task Sequences need to be deployed to carry out the Feature Update in order to clean-up the workstation prior to upgrade or refresh Applications and Drivers to compatible versions.
Doing this carries a burden on the infrastructure. An entire OS image (~5.5GB for 20H2) needs to be stored on Distribution Points in addition to the OS image used for a bare metal OS deployment Task Sequence. Workstations need to download the entire package in order to upgrade. In reality, they do not need all of the files in the package because they already have many of them.
What if we could deploy only the files needed for the Feature Update and even allow clients to download them directly from Windows Update?
Well, now we can! ConfigMgr 2103 introduces integration between the Software Update Point and Task Sequences. Below we will step through how to configure this.
There is no change to the user experience whether you use an upgrade Task Sequence based on an OS image (wim) or Feature Update (esd) file.
Pre-requisites
A Software Update Point must be configured in the Configuration Manager environment.
The SUP must be configured to download the Upgrade classification for the product Windows 10, version 1903 and later.
The SUP must be syncing the same language updates as the workstations that will be targeted for upgrade.
Basic Upgrade Task Sequence
The first thing you may think is that we can simply create a new task Sequence and select a new option in the wizard. Nope, sorry!
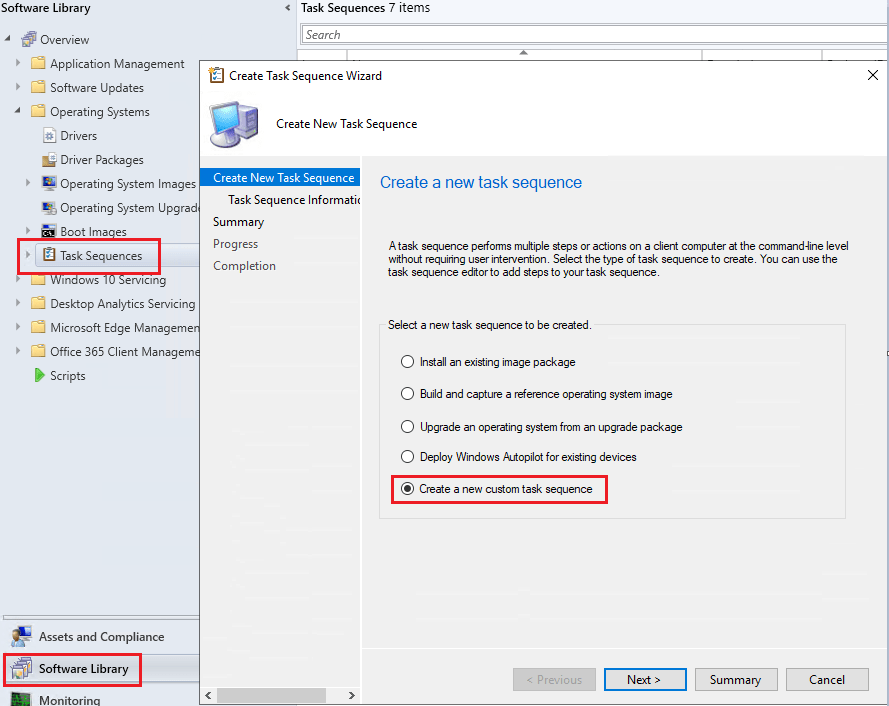
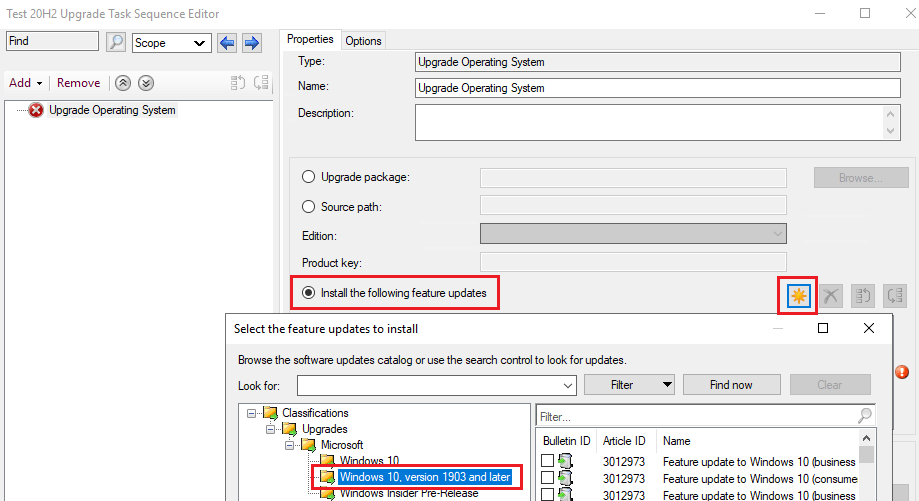
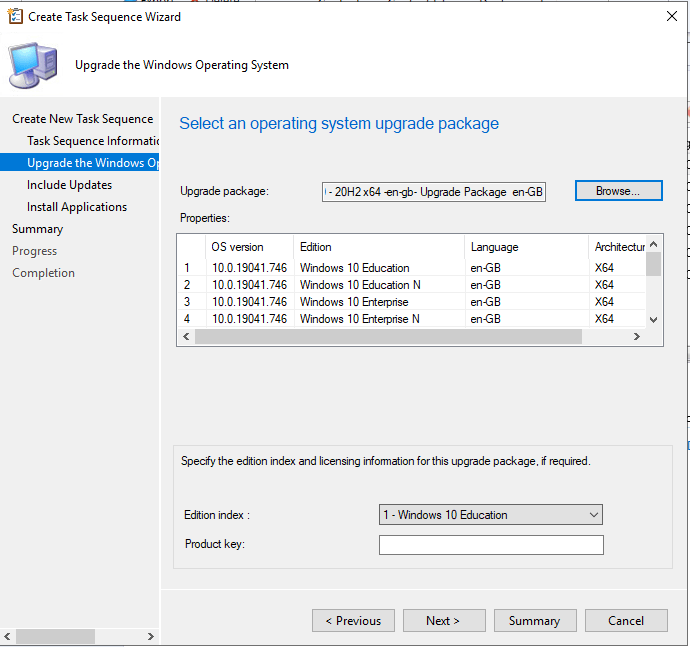
We must create a custom Task Sequence and add an upgrade step (or modify an upgrade template from the wizard but more on that later). To do this, open the ConfigMgr console:
Go to Software Library > Operating Systems > Task Sequences > Right click Task Sequences and select Create Task Sequence.
Select Create a new custom task sequence
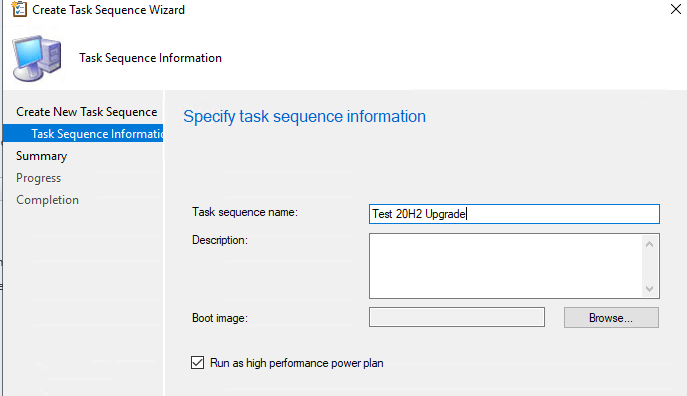
Give the Task Sequence a Name. Do not attach a Boot image. Optionally select Run as high performance power plan.
Next to create the empty Task Sequence.
Navigate to the new Task Sequence and edit it to open the editor.
Select Add > Images > Upgrade Operating System
On the right, select Install the following feature updates and click the sun symbol.
Expand Classifications > Upgrades > Microsoft > Windows 10, version 1903 and later
Select the version and language you wish to deploy. In this instance it is business editions, 20H2 en-gb x64.
Next go to Add > General > Restart Computer
On the right under Specify what to run after restart: select The currently installed default operating system.
Select OK. That is the all we need to create a basic Task Sequence that will upgrade Windows 10 to 20H2.
This post will not cover all the steps of deploying a Task Sequence except to highlight that when you deploy the new Task Sequence you will find an additional item in the wizard called Deployment Package.
If you have deployed Software Updates from ConfigMgr then you will be familiar with this tab. This appears because we are making use of ConfigMgr’s Windows 10 Servicing components. Here we select which Deployment Package we want to download the update to or we can create a new one.
Note: If you have already downloaded the Feature Update to a Deployment Package then you are not presented with the Deployment Package tab in the wizard.
At the bottom you can select not to use a Deployment Package. Doing this means the client will use peers (if configured in the environment) or the internet based Windows Update service to download the Feature Update file. VPN clients with split tunnels for internet access may be a good target for such a configuration.
Testing the Deployment
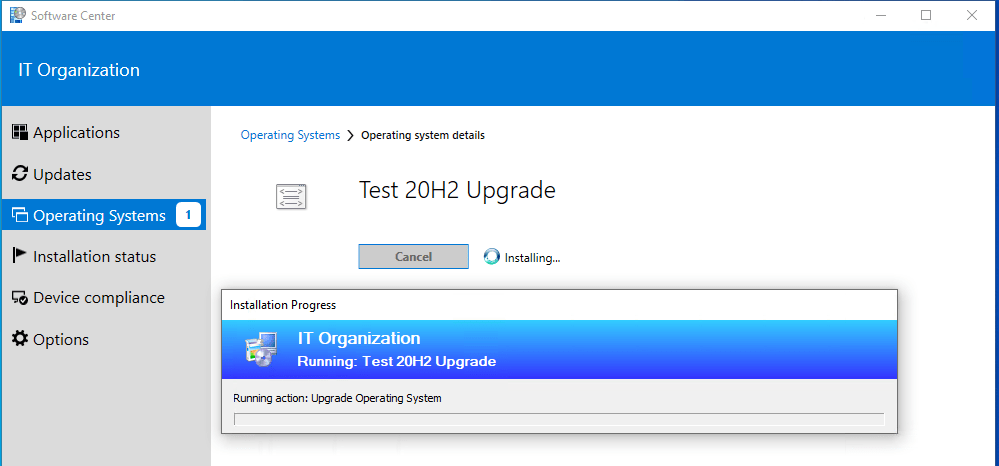
In the lab we have a Windows 10 1909 Enterprise x64 client that I have deployed a 20H2 Task Sequence upgrade to as an Available deployment. I selected the option for no deployment package so that the client downloads the update from the internet.
In Software Center we see the Task Sequence.
We select to install. The Task Sequence runs just like a normal upgrade Task Sequence.
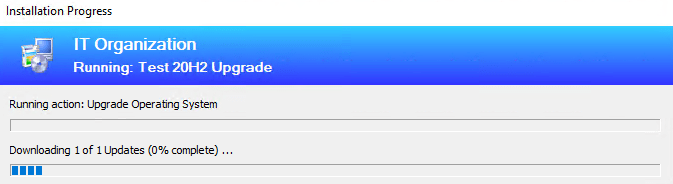
In the client’s ContentTransferManager.log we see the below line confirming that it has started downloading the .esd Feature Update file from Microsoft.
The .esd file is ~3.8GB. This is 30% less than the 5.5GB image we would have had to use in the old Task Sequence upgrade method.
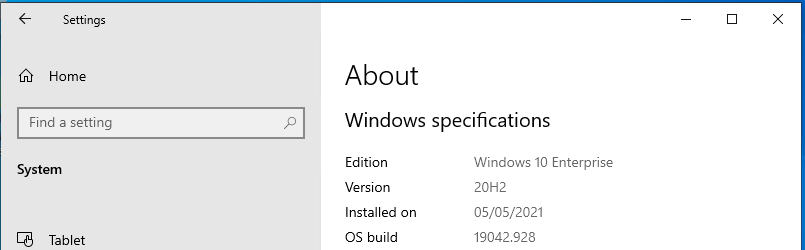
After the install the device restarted as part of the Task Sequence steps we configured. We now see version 20H2 is now running on the device.
Advanced Task Sequence
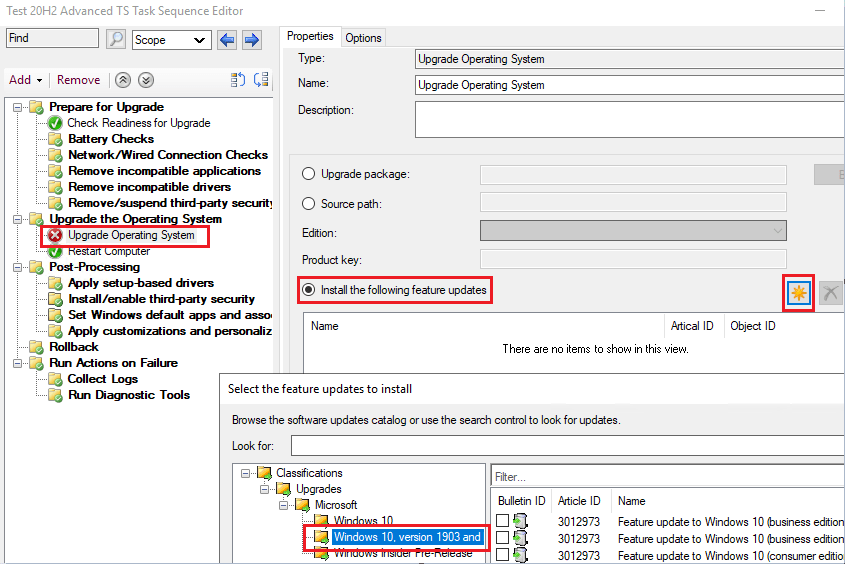
A more realistic Task Sequence for upgrade has a number of pre and post actions. This new way of delivering the .esd file can be piggybacked on to the template that Microsoft provide.
To do this you must already have an Operating System Upgrade image saved in ConfigMgr. It can be for any Feature Update version as we only need it to complete the wizard as you will see below.
Go to Software Library > Operating Systems > Task Sequences > Right click Task Sequences and select Create Task Sequence > Upgrade an operating system from an upgrade package
Give the Task Sequence a Name. Optionally select Run as high performance power plan.
On the Upgrade Package tab, select any Upgrade Package that is already in the environment. Don’t worry about the Edition index, just select Next.
Next all the way through and create the Task Sequence. Once created, edit the Task Sequence to display the editor.
Select the Upgrade Operating System step and change it to Install the following feature updates and click the sun symbol.
Expand Classifications > Upgrades > Microsoft > Windows 10, version 1903 and later
Select the version and language you wish to deploy. In this instance it is business editions, 20H2 en-gb x64.
Now we have an advanced template to build out all the steps we need.
Summary
The integration of Windows 10 Servicing components presents options for reducing the overall footprint of Feature Updates on a network. Previously, to reduce this required separating the advanced capabilities of Task Sequences from the actual upgrade delivered by Windows 10 Servicing.
Clients can now connect directly to Windows Update to download the Feature Update file for a Task Sequence upgrade rather than rely on the Distribution Points or a CDP enabled Cloud Management Gateway (the latter of which can incur costs).
I have deployed LAPS for a number of Enterprise customers to use for managing their Domain Member Windows Server local Administrator account passwords.
In the final part of this blog series we will look at how to audit LAPS password access.
LAPS generated passwords are stored on the Active Directory Computer Object in the attribute ms-Mcs-AdmPwd.
By default, when a principal with the AD permission Read ms-Mcs-AdmPwd reads the attribute ms-Mcs-AdmPwd there is no log entry made on the Domain Controller. Therefore, a compromised account could dump all LAPS set passwords from AD undetected.
We can configure auditing within Active Directory. The LAPS Powershell module allows us to easily do this.
In the example below, Auditing is enabled for the Member Servers Organisational Unit.
All Computer Objects in the Member Server OU will now be audited for LAPS password reads.
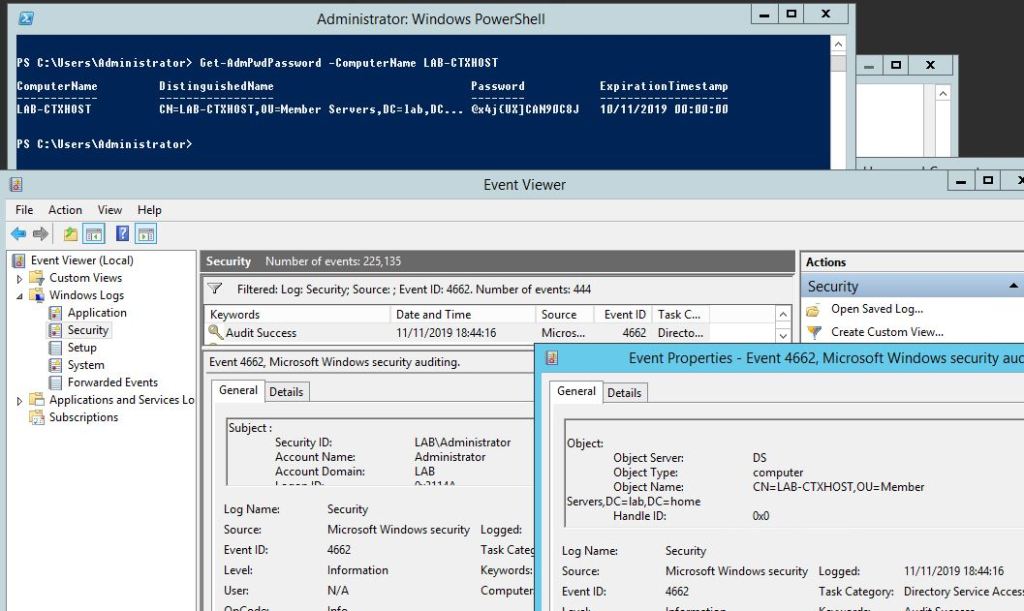
Event ID 4662 is logged in the Domain Controller Security event log every time the password attribute (ms-Mcs-AdmPwd) is read. Which Domain Controller it is logged on depends on which Domain Controller the request is sent to by the client requesting it.
Powershell retrieval of the password triggers event ID 4662 on the Domain Controller
The log entries can be parsed using a combination of the event ID and the schemaIDGUID for the attribute ms-Mcs-AdmPwd (which is unique to each AD Forest).
The three key items in the event are:
Security ID (account that read the password)
Object Name (Distinguished Name of the computer whose password was read)
schemaIDGUID (Identifier for the password attribute)
Run the below Powershell command from a device with the Active Directory Powershell module installed to extract the schemaIDGUID for the attribute ms-Mcs-AdmPwd.
I have deployed LAPS for a number of Enterprise customers to use for managing their Domain Member Windows Server local Administrator account passwords.
In part 3 of this blog series we will look at how to monitor LAPS operations.
LAPS is a Client Side Extension for Group Policy. LAPS is triggered each time Group Policy is refreshed on a device. This means you will not find it in Windows Services nor running as a process in Task Manager.
When LAPS is triggered, it checks the attribute ms-Mcs-AdmPwdExpirationTime on the host device’s Active Directory Computer Object. If this attribute has no value or is a date and time in the past then LAPS will attempt to set a new password.
First it will attempt to write the password to the attribute ms-Mcs-AdmPwd on the host device’s AD Computer Object. Once it confirms it has been successfully written to AD, LAPS updates the password on the host device (writes the password to the local Security Account Manager database).
LAPS will only set a new password if a Domain Controller is accessible after a new password has been generated. This ensures that AD always has the current password.
Monitoring LAPS
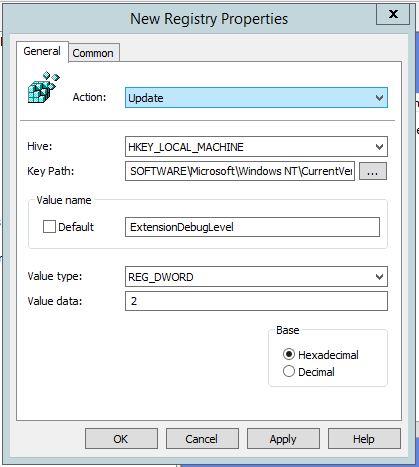
LAPS logs to the Application event log with the source AdmPwd. By default, LAPS only logs errors.
The logging level is set by the registry key below:
Silent mode; log errors only When no error occurs, no information is logged about CSE activity This is a default value
1
Log errors and warnings
2
Verbose mode, log everything
A full list of the possible log entries are in the document LAPS_TechnicalSpecification.docx which is included with the official LAPS download.
Setting the log entries to a value of 1 should suffice for most environments. Your existing monitoring solution may be able to be configured to generate alerts based on the Event Log entries from LAPS.
Logging Demonstration
The host LAB-CTXHOST has had LAPS installed. It has a GPO applied that sets LAPS to verbose logging by creating the below registry key:
On LAB-CTXHOST using RegEdit we can see that the registry key has been created.
RegEdit
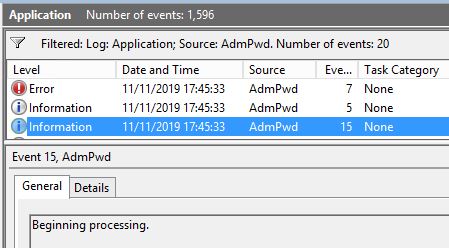
In Windows Event Log, we have filtered the log to only show events from the source AdmPwd.
Application event log filter
Logging Demo: Password Change Not Required
Now we force a Group Policy update by running gpupdate from the command line.
gpupdate
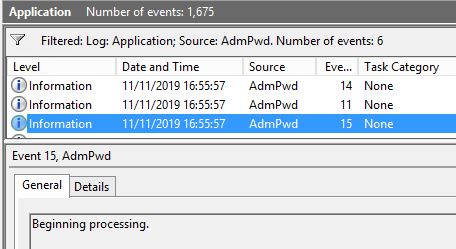
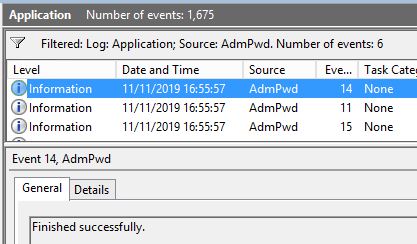
When we refresh the event log, we see event IDs 15, 11 then 14.
Event ID 15: Start of processing LAPS
Event ID 11: LAPS logic
Event ID 14: End of processing LAPS
Reading the events we can see that LAPS took no action because the password expiration date and time on the AD Computer Object for LAB-CTXHOST is 30 days in the future.
Logging Demo: Password Change Required
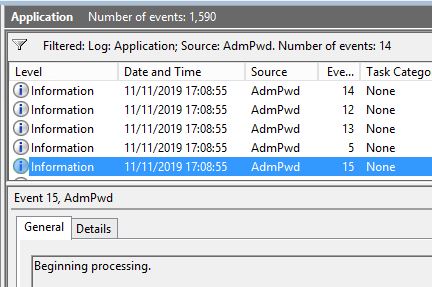
Using Powershell, we set the expiration date to be in the past. Now we run gpupdate and observe the log entries.
This time we see event IDs 15, 5, 13, 12 then 14.
Event ID 15: Start of processing LAPS
Event ID 5: LAPS has generated a new password and validated it against the GPO controlled password requirements.
Event ID 13: New password successfully written to Active Directory.
Event ID 12: New password successfully updated on the local administrator account.
Event ID 14: End of processing LAPS
Logging Demo: No Domain Controller Available
If the Domain Controller is inaccessible at the start of Group Policy processing, no LAPS log entries will appear. This is because Group Policy processing fails before the LAPS Group Policy Client Side Extension is triggered. LAPS will never reset the password under these conditions.
Logging Demo: No permission over object
During the installation of LAPS, we use the Set-AdmPwdComputerSelfPermission LAPS Powershell module cmdlet to apply the following permission to the Organisational Unit that contains the Computer Objects that are due to receive LAPS.
Principal: SELF
Permission: Write ms-Mcs-AdmPwd
Applies to: Descendent Computer Objects
This allows the devices to update their passwords in Active Directory.
We have now removed this permission for LAB-CTXHOST and used the LAPS Powershell module cmdlet Reset-AdmPwdPassword to set an expiration date and time that is in the past.
After running gpupdate we see the event IDs 15, 5 and 7.
Event ID 15: Begin processing LAPS
Event ID 5: LAPS has generated a new password and validated it against the GPO controlled password requirements.
Event ID 7: LAPS fails to write the password to AD
Summary
We have seen that using the Windows Event Log, we can view to a granular level which step of the LAPS process has failed. In production, logging level 1 (Errors and Warnings) should suffice and most monitoring solutions can be configured to read these logs entries and generate alerts.
I have deployed LAPS for a number of Enterprise customers to use for managing their Domain Member Windows Server local Administrator account passwords.
In Part 2 of this blog series we will look at the different ways to view and reset the passwords.
Part 4 of this blog series “Auditing” [Coming Soon]
Key Points
To view the LAPS passwords, you must be granted the All Extended Attributes permission over the object in Active Directory.
If the Group Policy setting “Do not allow password expiration time longer than required by policy” is set to Enabled; it will not be possible to set an expiry beyond the maximum LAPS Password Age Group Policy setting.
Graphical User Interface
When you install LAPS you are given the option of Management Tools to install.
LAPS Setup Options
The Fat client UI will install a simple app called AdmPwd.UI to the default install location %SYSTEMDRIVE%\Program Files\LAPS
When launched you can search for the computer name. The password will displayed along with the password expiration date.
Fat client UI
To manually reset the password, just click the Set button in LAPS UI tool. When a Group Policy refresh runs on the target machine, the password will be reset.
You can set a future date for the password to expire by clicking the drop down icon on the New expiration time field.
Powershell
When you install LAPS you are given the option of installing the Powershell Module.
Powershell module install
From a Powershell prompt, run the following commands to retrieve a LAPS password:
In the example below the password is being set to expire on 30th November 2019 at 10am.
By using Get-AdmPassword we can confirm that ExpirationTimestamp attribute has been updated.
When the server refreshes its GPO after 30th November 10am, it will read the expiration attribute and trigger
The password only resets if the client is able to write the new password to the AD computer object.
If the client does not have permission to do this or a Domain Controller cannot be contacted at that time then the new password is discarded before it is applied to the local admin account.
Writing the password to AD before the password is written to the local admin account protects against network interruptions during the process.
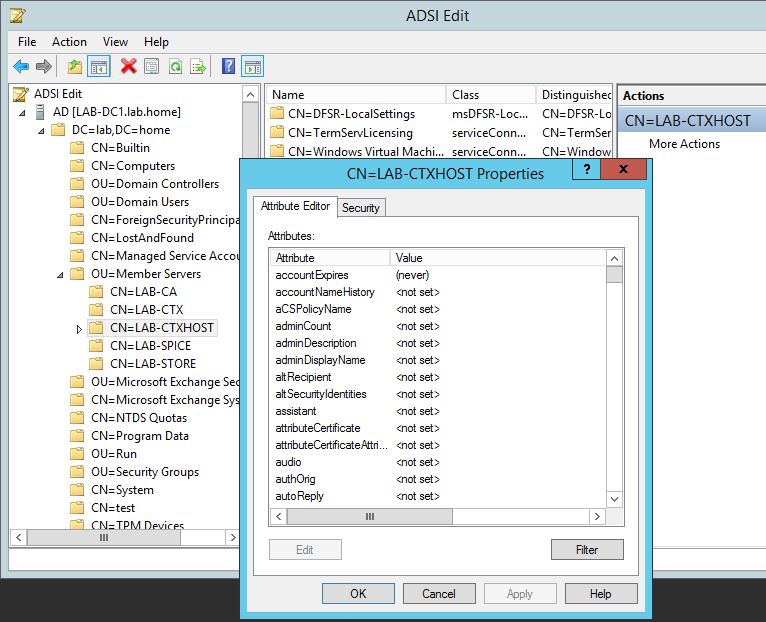
ADSI Edit
1. On any Domain Controller (or console running Active Directory Remote Server Administration Tools) open ADSI Edit by Right clicking the Start button and select Run.
2. Enter ADSIEdit.msc and select OK.
Run ADSIEdit.msc
3. Right click ADSI Edit in the left hand menu and select Connect to. Choose the Default Naming Context.
Connect to Default naming context
4. On the left, navigate down through the Active Directory structure by double clicking.
5. Browse to the client’s object, right click it and select properties.
Computer object
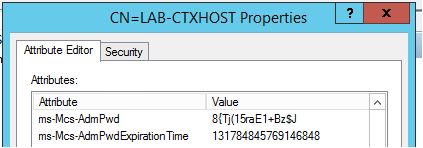
6. On the Attribute Editor tab, scroll to the attributes:
Password attribute
ms-Mcs-AdmPwd – Stores the password in clear text
ms-Mcs-AdmPwdExpirationTime – Stores the time to reset the password
The expiration time is displayed in computer date format. It must be manually converted to a readable date format.
You can set the expiration time here by converting the desired date back to computer date format and editing the attribute within ADSIEdit.
I have deployed LAPS for a number of Enterprise customers to use for managing their Domain Member Windows Server local Administrator account passwords.
In Part 1 of this blog series we will run through some of the prerequisite checks that I perform when asked to deploy LAPS.
This post is written assuming that we have already read the installation instructions for LAPS. The list does not have to be done sequentially. Although this post is written with Server deployments in mind, the same considerations apply to Workstation deployments.
1. Nominate a management host
Nominate a device on which we will install the LAPS management tools. I normally do this on a management server which will eventually be used to run the LAPS GUI and Powershell module from by administrators. The device must have at least .NET 4.0 and Powershell 2.0.
This can of course be installed on workstations too. In the real world though many enterprises have management servers from which most admin tasks are done.
2. Nominate a test server
This is for testing the LAPS Client Side Extension and GPO. Recommended to be a Virtual Machine on which snapshots/checkpoints can be taken. Should be a non-critical server that we can reboot multiple times.
3. List the Distinguished Names of all Organisational Units that contain the target Member Servers
Typically customers will create an Organisational Unit branch called “Servers” under which they will store all of their server computer accounts. Sometimes there are servers elsewhere so it’s always good to check so that we can target all Servers with a GPO. Get all the servers not in the expected Organisational Unit branch.
In the code snippet, change the “*OU=Servers..” etc. to be the distinguished name of the OU under which the majority of the server computer accounts are.
4. Identify accounts with ‘All Extended Rights’ permission
LAPS passwords are stored on the Active Directory computer object. To view the passwords a user must have the ‘All extended rights’ permission.
By default only SYSTEM and Domain Admins have this permission. It is rare that other users will have been added, however, we should check for anyone who already has this permission so that we do not inadvertently grant unauthorised users access to the new local admin passwords.
In step 3, we created a list of Organisational Units that contain all the Windows Servers that we will target with LAPS. We will now produce a list of users that have the ‘All Extended rights’ permission over these Organisational Units.
The LAPS Powershell module that is installed when you do a Full install of the LAPS client comes with a useful function to do this: Find-AdmPwdExtendedRights
The below script feeds the list of OUs ‘ListOfOU.txt’ in to to the function and creates a list of permission holders per OU.
If any objects other than SYSTEM or Domain Admins appear in the ExtendedRightHolders column then these questions need to be answered:
a) do those objects still require the All Extended Rights permission?
b) are they authorised to be able to view passwords?
5. List of Security Principals that will have access to the LAPS passwords
An important discussion that needs to be had is “Who do you want to have access to local admin passwords?”
Too many organisations have nested Active Directory Security Groups that have inadvertently given junior IT staff Domain Admin rights. This is an ideal time to review this within your organisation or with your customer.
You can grant additional security groups the “All Extended Rights” attribute so that they do not need to have Domain Admin rights.
6. Reboot Schedule
Many Enterprises do not use SCCM to manage their Servers. Another way to deploy the LAPS installer is using Group Policy Software Installation. A draw back of this is that the client machine needs to restart in order for LAPS to install during startup.
To minimise disruption, it may be beneficial to apply the Group Policy at the start of the monthly Windows Security updates schedule and take advantage of the already agreed reboot schedules for servers.
7. Active Directory Replication
One part of deploying LAPS is extending the Active Directory Schema to add the password and password expiration date attributes to computer objects. This relies on AD replication being functional.
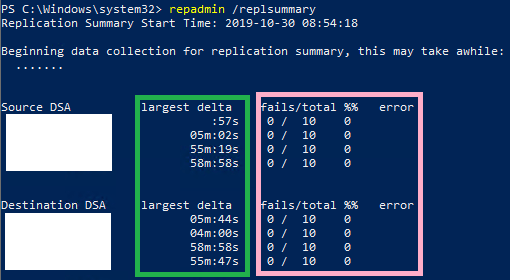
We can save ourselves a lot of headache during a Change Request window if we check AD replication health prior to the deployment
repadmin /replsummary
repadmin /replsummary command output
In the green box is the largest time since the last replication for all links on the listed outbound (top) or inbound (bottom) server. If any of these are in multiples of hours then there may be a replication problem.
In the pink box; if there are any failures then there is definitely a replication problem.
We must resolve issues with AD replication before we start implementing LAPS.
8. Identify Read Only Domain Controllers
The two attributes that are added when LAPS extends the Active Directory schema are:
ms-Mcs-AdmPwd
Stores the password in clear text
ms-Mcs-AdmPwdExpirationTime
Stores the time to reset the password
By default the ms-Mcs-AdmPwd attribute is on the Filtered Attribute Set for Read Only Domain Controllers. This means that it is not replicated to RODCs. IT will not be able to retrieve LAPS passwords from the RODC.
There is logic to this, RODCs are typically located in branch locations classed as insecure. They may be behind a locked door but that door could be cupboard on the ground floor and is accessed by many non-IT staff. It must be assumed that that the RODC may one day be stolen and so we want to minimise the impact should this occur.
Do we really want the RODC to store all of the local admin passwords for all of the Servers on the network?
To be able to extent the Active Directory Schema we need Schema Admin Rights. In a tightly controlled environment we need to get the request for these rights in early. No Schema Admin, no LAPS.
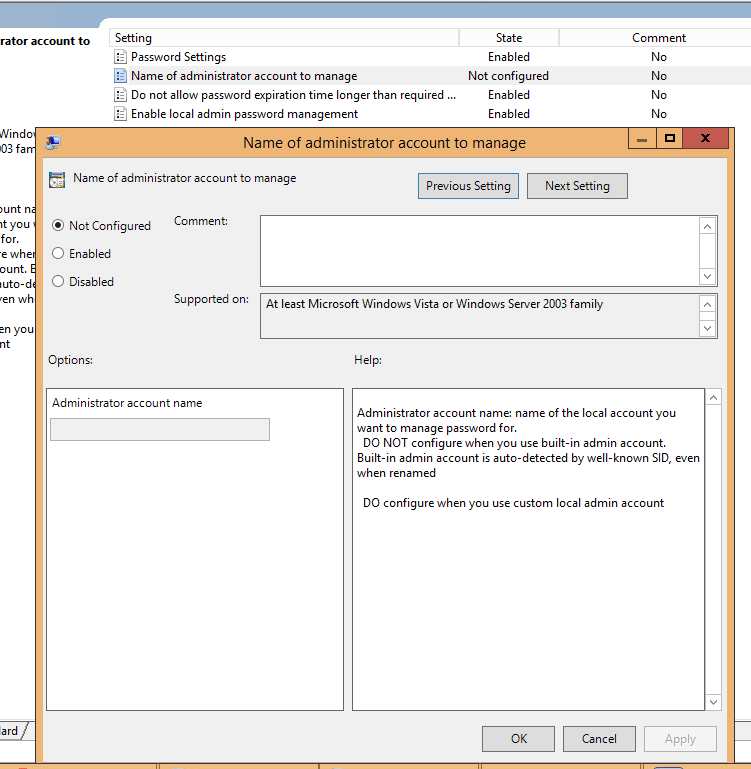
11. Name of Local Administrator account
Some organisations have multiple local admin accounts on a server.
You can only manage one account per server per policy.
One device can only be managed by one policy.
We should look to reduce the number of local admin accounts in use on the estate in favour of Domain User and Service Accounts with Role Based Access Control. A single local admin account can meet the needs of the majority of estates.
In LAPS you can just choose to manage the Built-in Local Administrator account regardless of what it is has been renamed to by leaving the Group Policy setting as Not Configured. This is easiest.
If however you need to manage non-Built-in Local Admin accounts then you will need to ensure that all target clients have the desired admin account present and named correctly. If the name is not the same then it will not be managed by LAPS.
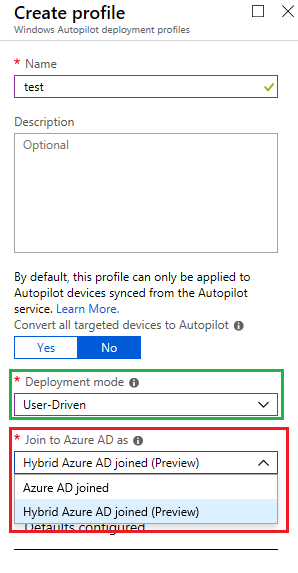
Microsoft recently released two hotly anticipated Intune Preview features:
Self-Deploying Autopilot – Azure AD Joined
User-Driven Autopilot – Hybrid Azure AD Joined
Naturally Microsoft has added logic to the menu selections in the Autopilot Deployment Profiles that greys out incompatible menu options. I have found and reported to Microsoft a bug that allows you to select incompatible options. Doing so causes you Autopilots to fail.
Creating a new policy and selecting Deployment mode: User-Driven Autopilot – gives you two options:
Azure AD Join
Hybrid Azure AD Joined (Preview)
Selecting Self-Deploying (Preview) locks the ‘Join to Azure AD as’ drop down menu on to Azure AD Joined. This is desired because Hybrid Azure AD Join is not available for Self-Deploying mode (yet).
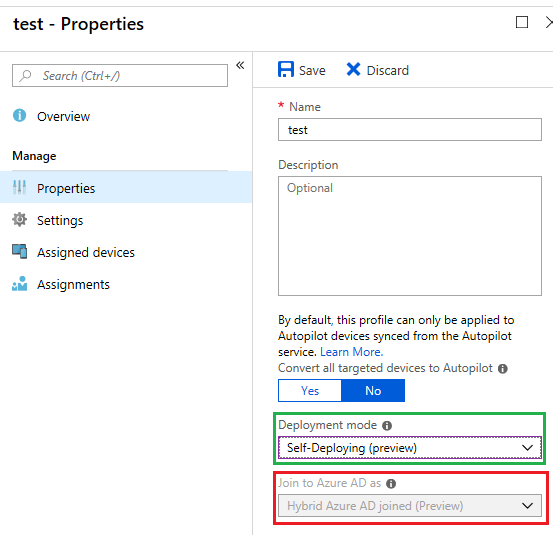
Now the bug…
Save a policy with the User-Driven – Hybrid Azure AD Joined options selected.
Go back in to the policy and select Properties.
Change the Deployment Mode to “Self-Deploying”.
Note that the ‘Join to Azure AD as’ drop down stays greyed out on the invalid option ‘Hybrid Azure AD Joined’ .
The impact…
This is not just cosmetic. By doing this the Autopilot device will fail on the Enrolment Status Page (ESP) with the error: 0x801c03ed.
Update 7th Feb 2023 - This post was written for an earlier version of Autopilot. The solution in this post does not apply to any versions of Windows 10 that are currently in support.
During Windows AutoPilot in User Driven mode you may see the following error on the Network tab (after Windows has downloaded the AutoPilot profile but before the reboot). It takes about 10-20 minutes for this error to display.
Something went wrong.
Confirm that you are using the correct sign-in information and that your
organisation uses this feature. You can try to do this again or contact
your system administrator with the error code 80004005
Check that the device has a clear line of sight to to a Domain Controller. This is a requirement of User-Driven Autopilot.