💡 Many organisations are completing their Windows 11 rollouts, and the improved Snap layouts feature is one I see underused for multitasking. Despite being around since Windows 10, I encounter many people who are unfamiliar with it. I’ve made a short video showing how Snap layouts work and why they’re a highlight for anyone juggling multiple apps. If you’re new to Windows 11 or just want to get more organised, this is worth a look.
Let me know if you’ve found other Windows 11 features that help you work smarter.
In this post I will explain how to use Microsoft Intune or Active Directory Group Policy to disable Windows Copilot for one or more users.
Introduction
On 26th September 2023, Microsoft released optional update KB5030310, one of the most ground breaking updates to Windows in recent times. With it comes Windows Copilot, which for millions of users worldwide will serve as an introduction to using an AI powered chat interface to enhance their day to day productivity.
Many organisations are still adjusting to the march to an AI enabled workplace and so need some time to test and understand before unleashing it for their workforce.
A recent addition to the Policy CSP is the TurnOffWindowsCopilot setting, documented here. At the time of publishing this post there is no built-in setting in Intune to manage Windows Copilot. So we will create a custom OMA-URI policy:
In Intune, select Devices > Windows > Configuration Profiles > Createprofile.
Under Platform select Windows 10 and later.
Under Profile type select Templates.
Under Template Name select Custom > select Create.
Set the Value to 1 (setting it to 0 will enable Windows Copilot which is the default setting).
Save the policy and assign it to a security group containing users for whom you wish to disable Windows Copilot.
No reboot is required. When the user next signs in, the Windows Copilot icon in the taskbar will have been removed.
The Administrative Template that is used in the Group Policy version below cannot be imported in to Intune as a Custom Administrative Template. When you come to apply it to a device it will fail because it tries to modify a protected part of the registry.
Disable with Group Policy
Pre-Requisites
Obtain the WindowsCopilot.admx and WindowsCopilot.adml files from the C:\Windows\PolicyDefinitions file of a Windows 11 device that has the KB5030310 installed on it.
When Windows 11 23H2 is released it will include the same files.
Alternatively, you can download the files from my Github here.
Implement Group Policy
Import the WindowsCopilot.admx file to the PolicyDefinitions folder in your domain. This will either be C:\Windows\PolicyDefinitions on your Domain Controllers or if you have a central store configured (which you should do), it will be in a location like:
Import the WindowsCopilot.adml file to the PolicyDefinitions\en-US folder.
On a Domain Controller or from a device with the AD DS management tools installed, open Group Policy Management console.
Create a new Group Policy Object and name it something meaningful.
Edit the GPO, expand User Configuration > Administrative Templates > Windows Components > Windows Copilot
Open the setting Turn off Windows Copilot.
Set it to Enabled.
Select OK. The policy will now look like this:
Link the GPO to an Organisational Unit that contains users for whom you wish to disable Windows Copilot.
No reboot is required. When the user next signs in, the Windows Copilot icon in the taskbar will have been removed.
Summary
Windows Copilot provides an opportunity for users to begin experimenting with a new way to command their computers. In a production environment, it is important to use deployment rings such as Test, Pilot and Broad to prepare for and understand the impact of any change to the environment. An ability to roll back for individual users is most welcome. Fortunately, Microsoft have made it easy to switch Windows Copilot on and off on a targeted basis.
In this post I will describe how to install the Windows Copilot Preview update.
Introduction
On 26th September 2023, Microsoft released optional update KB5030310, one of the most ground breaking updates to Windows in recent times. With it comes Windows Copilot, which for millions of users worldwide will serve as an introduction to using an AI powered chat interface to enhance their day to day productivity.
Now lets walk through how you can get your hands on it.
Prerequisites
A device running Windows 11 22H2.
An environment that allows you to manage your Windows Update settings (some corporate networks prevent users from doing this by restrictive policies).
Installing Windows Copilot Preview
The process requires a reboot
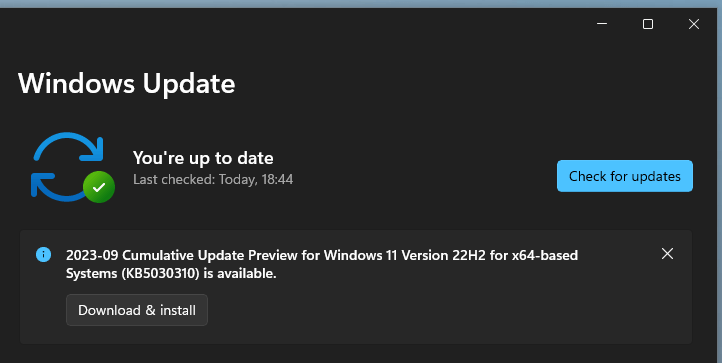
From the Desktop select Start > Settings > Windows Update.
Turn on Get the latest updates as soon as they’re available.
Enabling preview features may reveal additional features unrelated to Windows Copilot. I recommend only doing this on test devices.
Select Check for Updates.
The update “2023-09 Cumulative Update Preview for Windows 11 Version 22H2 for x64-based Systems (KB5030310)” will appear.
It is possible to install the update without enabling Get the latest updates as soon as they're available however, Windows Copilot will be hidden.
If you don’t see the update, try selecting Advanced options > Optional updates.
Install the update.
Reboot the device.
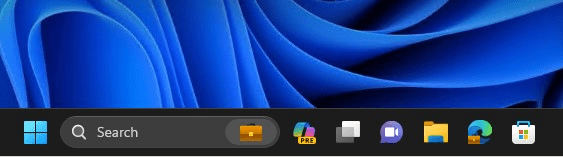
Login and wait for the Desktop to load. You will now see the Copilot Preview icon
Select the icon and you will be presented with Windows Copilot! Enjoy!
The screenshot above was taken while logged in on an Azure AD joined device that had Bing Chat Enterprise enabled. This is what the Protected green shield at the top signifies.
Summary
Welcome to a new way of commanding your device. As you can see, it is easy to install the preview. When Windows 11 23H2 is released in Q4 2023, Windows Copilot will be enabled by default. Check out Microsoft’s 2 minute video overview of features in this update:
Why Microsoft Intune uses an Apple Push Notification Certificate
Key points of APN certificate management in Intune
Checking if the APN certificate is expired
How to Renew an APN certificate in Microsoft Intune
Note: This post assumes that you already have Intune configured with an Apple Push Notification certificate and are managing Apple devices via Intune MDM.
What is an APN certificate used for?
An Apple Push Notification certificate is issued by Apple and is used by a Mobile Device Management system to authenticate itself to the Apple devices that it manages. In the case of Microsoft Intune, it sends the APN certificate to the Apple device and the Apple device, such as an iPhone, validates the certificate before accepting management messages from Intune.
Key points of APNC management in Intune
If the APN certificate expires and the grace period of 30 days passes then ALL of the Apple devices managed by Intune MDM will stop accepting management tasks from Intune. If this happens then all devices will need to be re-enrolled in Intune. This is a difficult task for a large organisation!
When an APN certificate is due to expire you must always renewthe certificate and not create a new one. Using a brand new certificate will break the trust between your existing Apple devices and Intune. If you accidentally do this, you can revisit the Apple portal and renew the expiring certificate. Loading that in to Intune should restore service for the existing Apple devices.
Your APN certificate is tied to the Apple ID that was used to create it. If you do not have access to this Apple ID (such as it was created in the name of a former employee) then start taking steps now to gain access! One workaround is to contact Apple Developer Program Support with the certificate details and they will be able to migrate the certificate to another Apple ID.
Once a renewed APN certificate is loaded in to Intune, all Apple devices will seamlessly transition to accepting the new certificate. There are no device side changes required
Where to find your APN certificate expiry date
It is extremely important to be aware of when your APN certificate is due to expire for the reasons mentioned above.
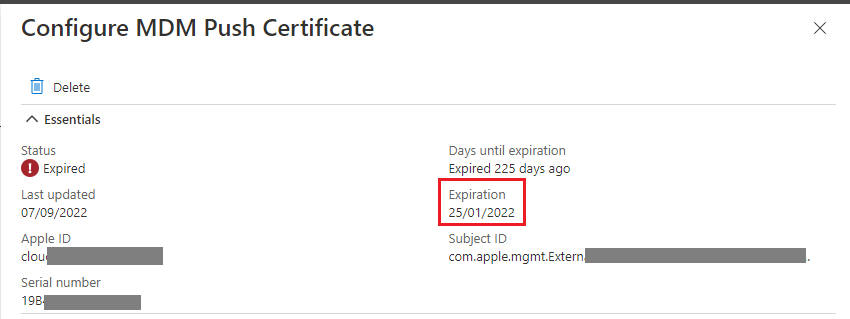
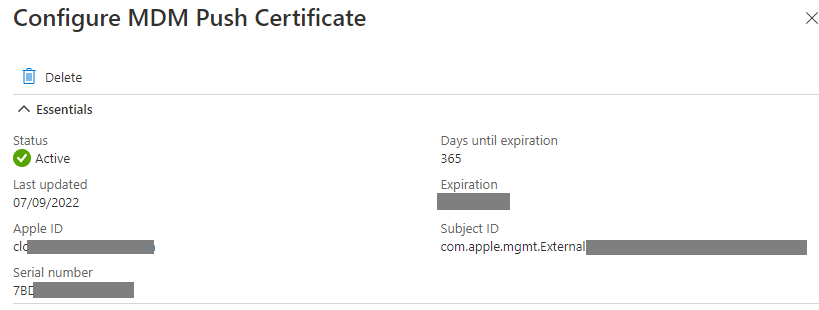
In the Endpoint Manager portal https://aka.ms/dmac > Devices > Enroll devices > Apple enrollment > Apple MDM Push certificate
On this page you will see which Apple ID the created the certificate as well as the expiry date.
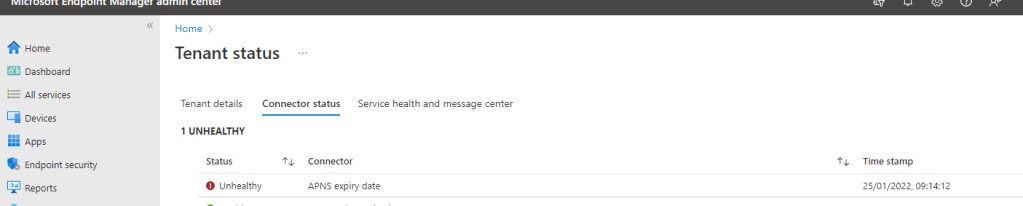
If your APN certificate has already expired then you will see the following alert on the Home > Connector status tab of the Endpoint Manager portal as seen below:
How to renew an APN certificate in Microsoft Intune
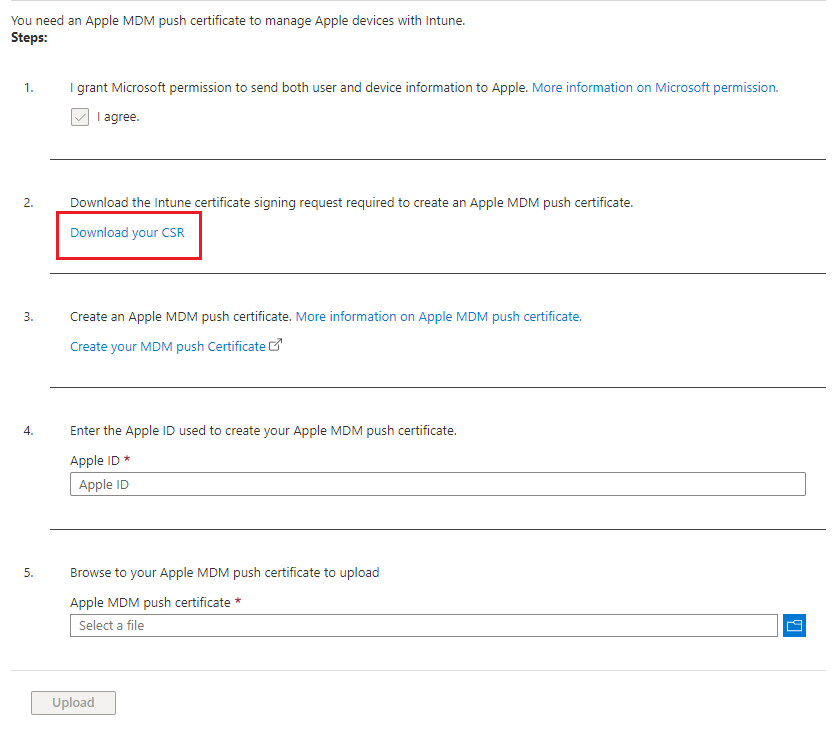
In the Endpoint Manager portal https://aka.ms/dmac > Devices > Enroll devices > Apple enrollment > Apple MDM Push certificate.
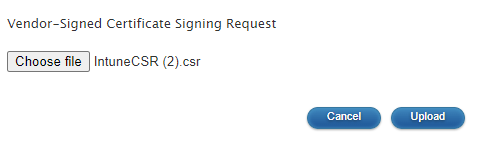
The lower section of the page allows you to renew your certificate. Select Download your CSR.
A file called IntuneCSR.csr will be downloaded.
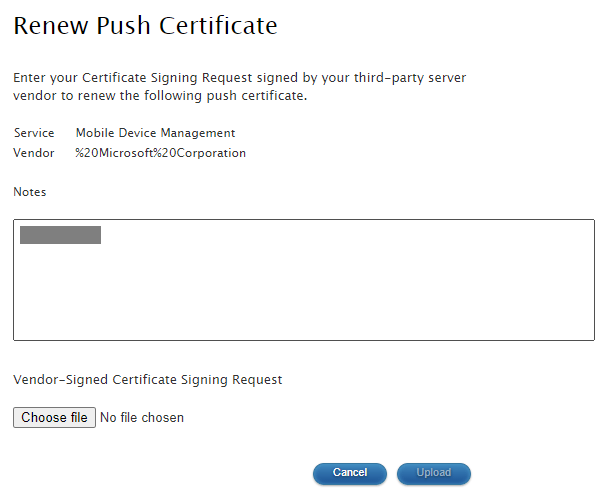
Select Create your MDM push Certificate > Login to the Apple portal that opens with the same Apple ID as was used to create the soon to expire APN certificate.
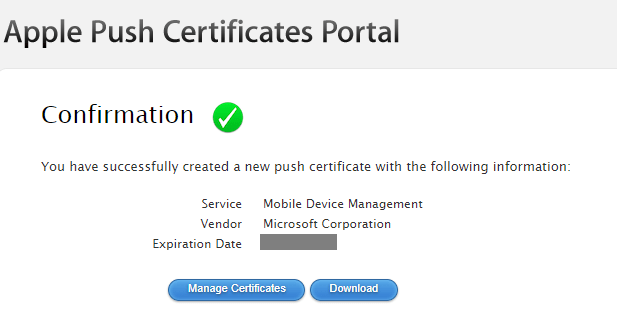
Select Renew next to the certificate. DO NOT select Create new certificate!
A file called MDM_Microsoft_Corporation_Certificate.pem will be downloaded.
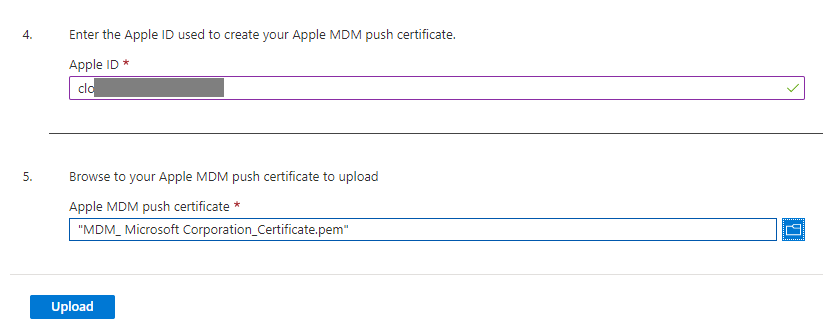
Back on the Intune portal, enter the Apple ID used to create the Apple certificate > Upload the .pem file.
Once Intune validates the certificate it will show as Active with a green tick at the top of the page. There are no devices side actions required.
Summary
The Apple Push Notification certificate enhances the security of Intune MDM. Maintaining it is often overlooked because it is easy to set up and normally created as part wider project to migrate to Intune with many moving parts.
It is essential however to stay ahead of expiry and failing to do so can have a huge impact on device management. It should be treated like any other certificate maintenance plan. Key tasks are:
The Apple ID credentials are recorded and stored securely.
The expiration date is entered in to a calendar that can alert IT staff.
The steps to renew the certificate are recorded in a knowledgebase.
Microsoft Endpoint Configuration Manager Current Branch 2103 now combines the ease of Windows 10 Servicing with the versatility of Task Sequences.
The Windows 10 Servicing node in ConfigMgr has been around for some time however many organisations have not been able to rely on it solely for workstation upgrades. Frequently Task Sequences need to be deployed to carry out the Feature Update in order to clean-up the workstation prior to upgrade or refresh Applications and Drivers to compatible versions.
Doing this carries a burden on the infrastructure. An entire OS image (~5.5GB for 20H2) needs to be stored on Distribution Points in addition to the OS image used for a bare metal OS deployment Task Sequence. Workstations need to download the entire package in order to upgrade. In reality, they do not need all of the files in the package because they already have many of them.
What if we could deploy only the files needed for the Feature Update and even allow clients to download them directly from Windows Update?
Well, now we can! ConfigMgr 2103 introduces integration between the Software Update Point and Task Sequences. Below we will step through how to configure this.
There is no change to the user experience whether you use an upgrade Task Sequence based on an OS image (wim) or Feature Update (esd) file.
Pre-requisites
A Software Update Point must be configured in the Configuration Manager environment.
The SUP must be configured to download the Upgrade classification for the product Windows 10, version 1903 and later.
The SUP must be syncing the same language updates as the workstations that will be targeted for upgrade.
Basic Upgrade Task Sequence
The first thing you may think is that we can simply create a new task Sequence and select a new option in the wizard. Nope, sorry!
We must create a custom Task Sequence and add an upgrade step (or modify an upgrade template from the wizard but more on that later). To do this, open the ConfigMgr console:
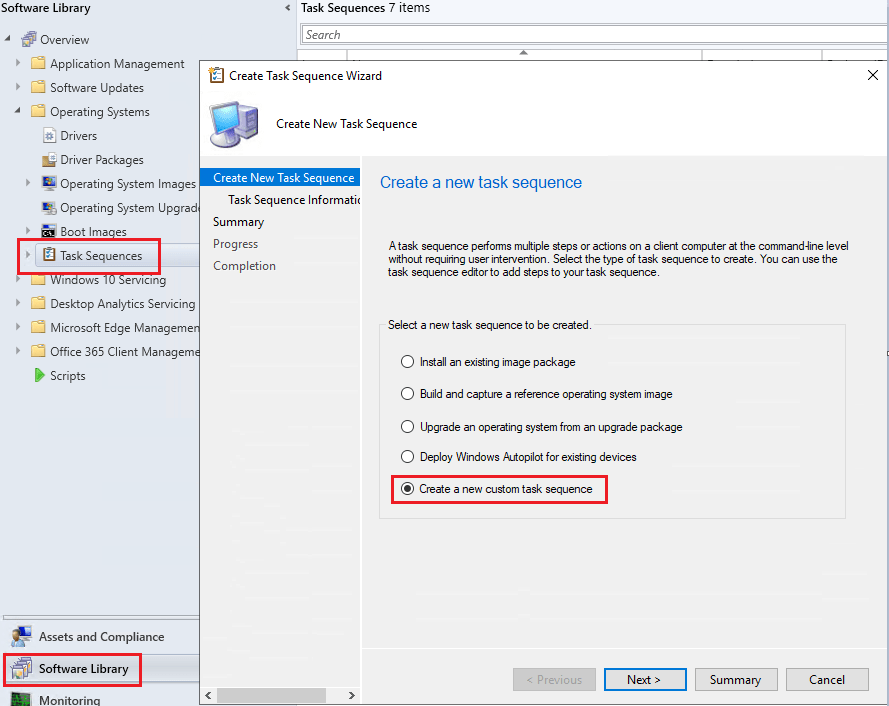
Go to Software Library > Operating Systems > Task Sequences > Right click Task Sequences and select Create Task Sequence.
Select Create a new custom task sequence
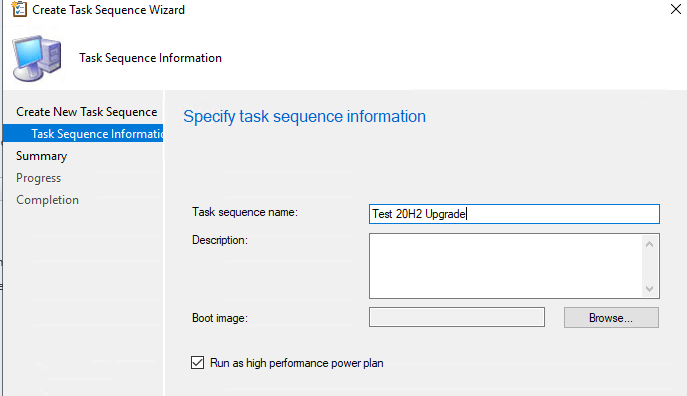
Give the Task Sequence a Name. Do not attach a Boot image. Optionally select Run as high performance power plan.
Next to create the empty Task Sequence.
Navigate to the new Task Sequence and edit it to open the editor.
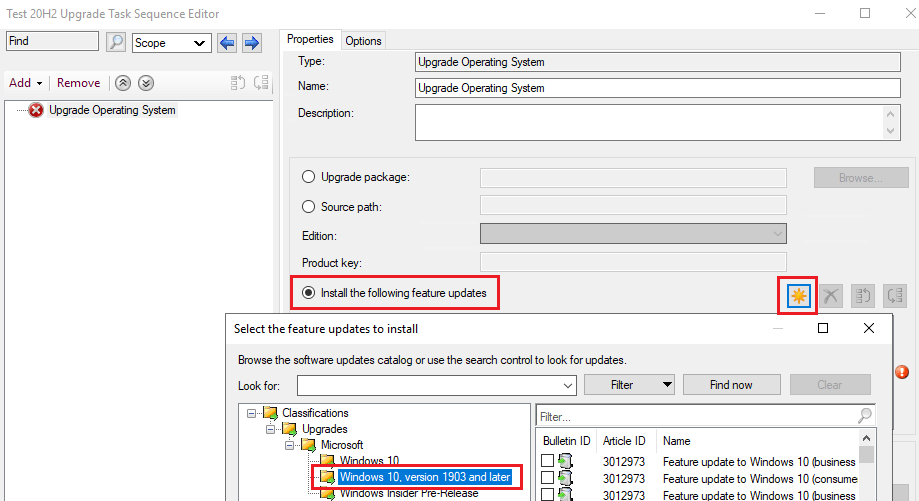
Select Add > Images > Upgrade Operating System
On the right, select Install the following feature updates and click the sun symbol.
Expand Classifications > Upgrades > Microsoft > Windows 10, version 1903 and later
Select the version and language you wish to deploy. In this instance it is business editions, 20H2 en-gb x64.
Next go to Add > General > Restart Computer
On the right under Specify what to run after restart: select The currently installed default operating system.
Select OK. That is the all we need to create a basic Task Sequence that will upgrade Windows 10 to 20H2.
This post will not cover all the steps of deploying a Task Sequence except to highlight that when you deploy the new Task Sequence you will find an additional item in the wizard called Deployment Package.
If you have deployed Software Updates from ConfigMgr then you will be familiar with this tab. This appears because we are making use of ConfigMgr’s Windows 10 Servicing components. Here we select which Deployment Package we want to download the update to or we can create a new one.
Note: If you have already downloaded the Feature Update to a Deployment Package then you are not presented with the Deployment Package tab in the wizard.
At the bottom you can select not to use a Deployment Package. Doing this means the client will use peers (if configured in the environment) or the internet based Windows Update service to download the Feature Update file. VPN clients with split tunnels for internet access may be a good target for such a configuration.
Testing the Deployment
In the lab we have a Windows 10 1909 Enterprise x64 client that I have deployed a 20H2 Task Sequence upgrade to as an Available deployment. I selected the option for no deployment package so that the client downloads the update from the internet.
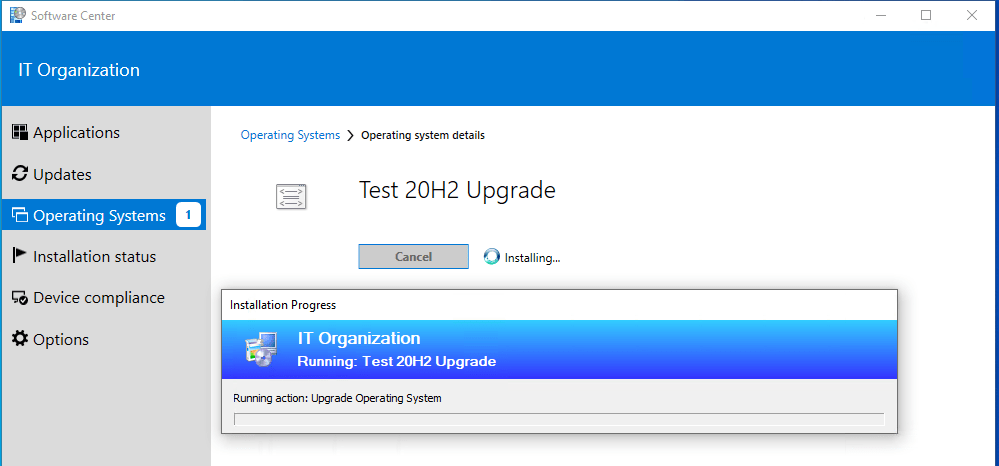
In Software Center we see the Task Sequence.
We select to install. The Task Sequence runs just like a normal upgrade Task Sequence.
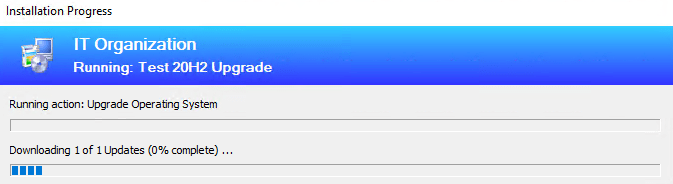
In the client’s ContentTransferManager.log we see the below line confirming that it has started downloading the .esd Feature Update file from Microsoft.
The .esd file is ~3.8GB. This is 30% less than the 5.5GB image we would have had to use in the old Task Sequence upgrade method.
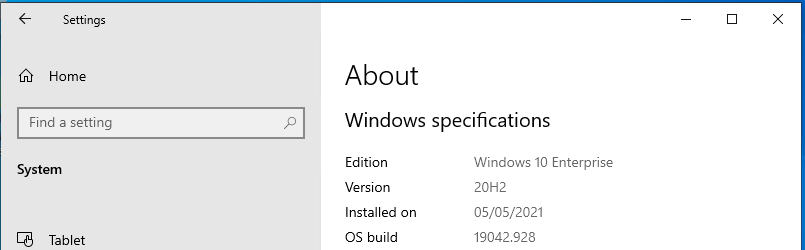
After the install the device restarted as part of the Task Sequence steps we configured. We now see version 20H2 is now running on the device.
Advanced Task Sequence
A more realistic Task Sequence for upgrade has a number of pre and post actions. This new way of delivering the .esd file can be piggybacked on to the template that Microsoft provide.
To do this you must already have an Operating System Upgrade image saved in ConfigMgr. It can be for any Feature Update version as we only need it to complete the wizard as you will see below.
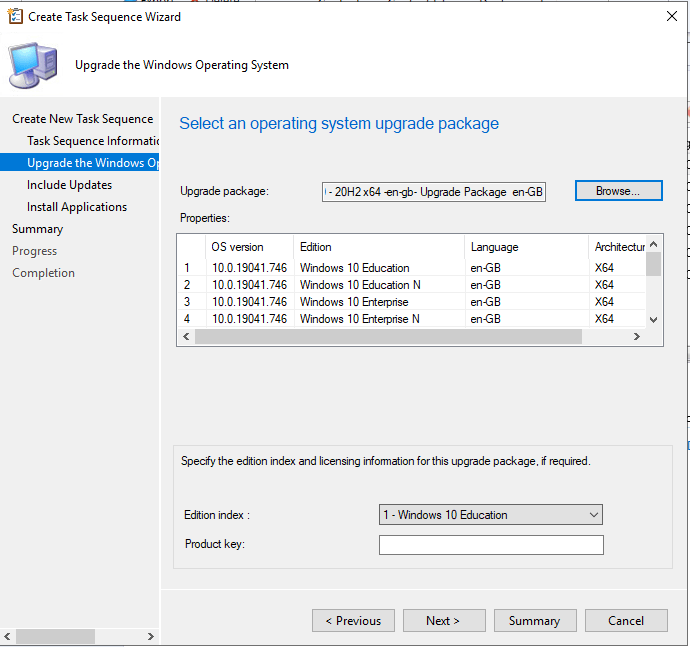
Go to Software Library > Operating Systems > Task Sequences > Right click Task Sequences and select Create Task Sequence > Upgrade an operating system from an upgrade package
Give the Task Sequence a Name. Optionally select Run as high performance power plan.
On the Upgrade Package tab, select any Upgrade Package that is already in the environment. Don’t worry about the Edition index, just select Next.
Next all the way through and create the Task Sequence. Once created, edit the Task Sequence to display the editor.
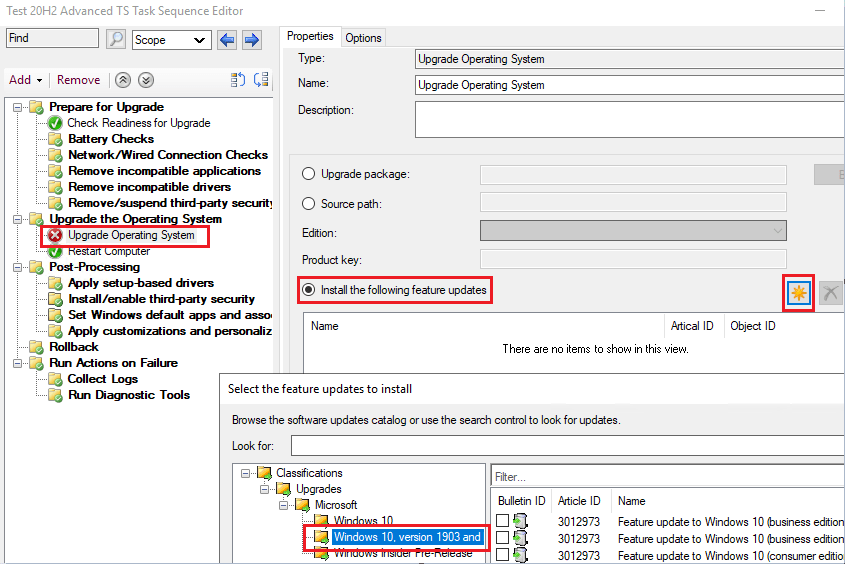
Select the Upgrade Operating System step and change it to Install the following feature updates and click the sun symbol.
Expand Classifications > Upgrades > Microsoft > Windows 10, version 1903 and later
Select the version and language you wish to deploy. In this instance it is business editions, 20H2 en-gb x64.
Now we have an advanced template to build out all the steps we need.
Summary
The integration of Windows 10 Servicing components presents options for reducing the overall footprint of Feature Updates on a network. Previously, to reduce this required separating the advanced capabilities of Task Sequences from the actual upgrade delivered by Windows 10 Servicing.
Clients can now connect directly to Windows Update to download the Feature Update file for a Task Sequence upgrade rather than rely on the Distribution Points or a CDP enabled Cloud Management Gateway (the latter of which can incur costs).
Desktop Analytics is a powerful tool for helping plan deployments of Windows 10 Feature Updates. Two of its features are the Apps and Drivers tabs which provides cloud enabled insights in to your Application and Driver estate and its compatibility with Windows 10 Feature Updates.
The Apps tab has a Plan Installs column which tells you how many devices the particular Application is installed on. Similarly, the Drivers tab has a Plan Devices column which does the same.
One of the shortcomings of the Desktop Analytics console is that although it tells you how many devices have an Application or Driver , you cannot drill down further to get a list of those devices. Being able to view the list of devices without having to run a report in ConfigMgr is a challenge that I recently encountered.
In steps Log Analytics workspace queries! Desktop Analytics stores its data in a Log Analytics workspace. Using the query language Kusto (KQL) we can search the database directly and export lists of devices. Below I have shared the scripts I wrote to do this along with explanations of what they are doing.
Skip to the end of this post if you just want to see the scripts in their entirety.
Pre-requisites
Ability to run queries in the Log Analytics workspace in which Desktop Analytics resides.
Access to the Desktop Analytics console.
Prepare
1. Get the exact wording for the search terms
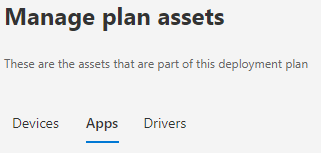
First go to the Desktop Analytics console and drill down in to your Deployment Plan > Plan assets > Apps.
Select the Application that you want to report on from the list. In this example I want Adobe Acrobat Reader DC version 21.001.20145.
Copy the exact wording of the name and version number. We will use this in the script query.
If you are searching for a Driver then you go to Deployment Plan > Plan assets > Drivers.
Select the Driver that you want to report on from the list. In this example I want the HP HD Camera Driver spuvcbv64.sys version 3.7.8.5.
Again, ensure to copy the exact wording of the name and version number.
2. Open a Log Analytics workspace query
Navigate to the Log Analytics workspace that contains the Desktop Analytics data. On the left hand menu select Logs.
You should see a blank New Query 1 window (you may have to close the Queries popup to see this).
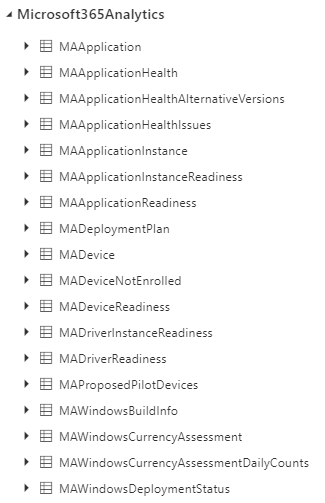
The scripts use tables in the Microsoft365Analytics sphere. If you expand this on the left you will see all the available tables.
Tip: Double clicking a table will add it to the query pane. Select Run with just the name of a table in the query pane and you will see all the data in the table.
Scripts Deep Dive
Tip: Desktop Analytics takes a data scrape from Microsoft’s central Telemetry repository once every 24 hours. The historical data is left in the tables. So when searching a table be sure to filter by the last 24 hours to prevent duplication of results!
Applications
There are three sections to this code that deal with each table it needs to work through to find the device names from a given Application name.
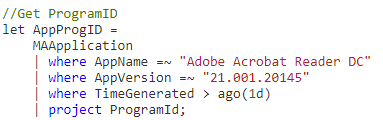
Part 1
Creates a variable named AppProgID.
Searches the MAApplication table for the Application name and version number. Filter on the most recent data scrape (last day) and extract only the unique ProgramID. There is one ProgramID per Application/Version pairing so each version of Adobe Acrobat Reader DC has its own unique ProgramID.
Tip: You can leave the AppVersion field empty if you are searching for an Application that Desktop Analytics has not detected the version of. You will encounter these In the DA console, the version field is blank.
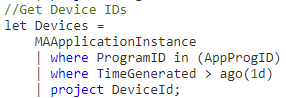
Part 2
Another variable is created called Devices. Searches the ProgramID column of the MAApplicationInstance table for entries matching the ProgramID stored in the AppProgID variable.
Filters for the most recent data scrape (last day) and extracts the unique device ID. These IDs are meaningless outside of Desktop Analytics so we need to convert these to the device names.
Part 3 (click to zoom in)
Search the DeviceID column in the MADevice table for anything matching entries in the Devices variable. Filters for the most recent data scrape (last day) and extracts a useful set of information about the devices.
Output (click to zoom in)
You can export this list to CSV by clicking Export at the top of the Query pane.
Drivers
Due to a difference in the way the data is stored in the tables there are only two parts to this script.
Part 1
Creates a variable named DeviceID.
Searches the MADriverInstanceReadiness table for the Driver name and version number. Filters on the most recent data scrape (last day) and extracts only the unique DeviceID of all devices that have the Driver installed.
Tip: You can leave the DriverVersion field empty if you are searching for a Driver that Desktop Analytics has not detected the version of. You will encounter these in the DA console, the version field is blank.
Part 2 (click to zoom in)
Search the DeviceID column in the MADevice table for anything matching entries in the DeviceID variable. Filters for the most recent data scrape (last day) and extracts a useful set of information about the devices.
Output (click to zoom in)
You can export this list to CSV by clicking Export at the top of the Query pane.
Scripts In Full
Applications
// Desktop Analytics: List workstations with a particular
// Application installed.
// Author: Marcus Zvimba, 28th April 2021
//
/////// INSTRUCTIONS
// Replace the text in the speech marks after AppName and AppVersion with the name and
// version of the Application as it appears in the Desktop Analytics console.
// The text is not case sensitive.
//

//Get ProgramID
let AppProgID =
    MAApplication
    | where AppName =~ "Adobe Acrobat Reader DC"
    | where AppVersion =~ "21.001.20145"
    | where TimeGenerated > ago(1d)
    | project ProgramId;
//Get Device IDs
let Devices =
    MAApplicationInstance
    | where ProgramID in (AppProgID)
    | where TimeGenerated > ago(1d)
    | project DeviceId;
//Get Device Names
MADevice
| where DeviceId in (Devices)
| where TimeGenerated > ago(1d)
| project DeviceName, DeviceId, DeviceLastSeenDate, Manufacturer, Model, OSVersion, OSEdition, OSBuildNumber, OSArchitecture
Drivers
// Desktop Analytics: List workstations with a particular
// driver installed.
// Author: Marcus Zvimba, 28th April 2021
//
/////// INSTRUCTIONS
// Replace the text in the speech marks after DriverName and DriverVersion with the name and
// version of the driver as it appears in the Desktop Analytics console.
// The text is not case sensitive.
//

//Get DeviceID
let DeviceID =
    MADriverInstanceReadiness
    | where DriverName =~ "spuvcbv64.sys"
    | where DriverVersion =~ "3.7.8.5"
    | where TimeGenerated > ago(1d)
    | project DeviceId;
//Get Device Names
MADevice
| where DeviceId in (DeviceID)
| where TimeGenerated > ago(1d)
| project DeviceName, DeviceId, DeviceLastSeenDate, Manufacturer, Model, OSVersion, OSEdition, OSBuildNumber, OSArchitecture
Summary
Kusto is a powerful language and once the core concepts are understood it can be leveraged to maximise the data available from Desktop Analytics. You can create graphical reports to compliment the built-in reports in the Desktop Analytics console.
There is not much movement from Microsoft on the Desktop Analytics UserVoice forum so I highly recommend becoming familiar with how to query the data directly.