💡 Many organisations are completing their Windows 11 rollouts, and the improved Snap layouts feature is one I see underused for multitasking. Despite being around since Windows 10, I encounter many people who are unfamiliar with it. I’ve made a short video showing how Snap layouts work and why they’re a highlight for anyone juggling multiple apps. If you’re new to Windows 11 or just want to get more organised, this is worth a look.
Let me know if you’ve found other Windows 11 features that help you work smarter.
In this post I will explain how to use Microsoft Intune or Active Directory Group Policy to disable Windows Copilot for one or more users.
Introduction
On 26th September 2023, Microsoft released optional update KB5030310, one of the most ground breaking updates to Windows in recent times. With it comes Windows Copilot, which for millions of users worldwide will serve as an introduction to using an AI powered chat interface to enhance their day to day productivity.
Many organisations are still adjusting to the march to an AI enabled workplace and so need some time to test and understand before unleashing it for their workforce.
A recent addition to the Policy CSP is the TurnOffWindowsCopilot setting, documented here. At the time of publishing this post there is no built-in setting in Intune to manage Windows Copilot. So we will create a custom OMA-URI policy:
In Intune, select Devices > Windows > Configuration Profiles > Createprofile.
Under Platform select Windows 10 and later.
Under Profile type select Templates.
Under Template Name select Custom > select Create.
Set the Value to 1 (setting it to 0 will enable Windows Copilot which is the default setting).
Save the policy and assign it to a security group containing users for whom you wish to disable Windows Copilot.
No reboot is required. When the user next signs in, the Windows Copilot icon in the taskbar will have been removed.
The Administrative Template that is used in the Group Policy version below cannot be imported in to Intune as a Custom Administrative Template. When you come to apply it to a device it will fail because it tries to modify a protected part of the registry.
Disable with Group Policy
Pre-Requisites
Obtain the WindowsCopilot.admx and WindowsCopilot.adml files from the C:\Windows\PolicyDefinitions file of a Windows 11 device that has the KB5030310 installed on it.
When Windows 11 23H2 is released it will include the same files.
Alternatively, you can download the files from my Github here.
Implement Group Policy
Import the WindowsCopilot.admx file to the PolicyDefinitions folder in your domain. This will either be C:\Windows\PolicyDefinitions on your Domain Controllers or if you have a central store configured (which you should do), it will be in a location like:
Import the WindowsCopilot.adml file to the PolicyDefinitions\en-US folder.
On a Domain Controller or from a device with the AD DS management tools installed, open Group Policy Management console.
Create a new Group Policy Object and name it something meaningful.
Edit the GPO, expand User Configuration > Administrative Templates > Windows Components > Windows Copilot
Open the setting Turn off Windows Copilot.
Set it to Enabled.
Select OK. The policy will now look like this:
Link the GPO to an Organisational Unit that contains users for whom you wish to disable Windows Copilot.
No reboot is required. When the user next signs in, the Windows Copilot icon in the taskbar will have been removed.
Summary
Windows Copilot provides an opportunity for users to begin experimenting with a new way to command their computers. In a production environment, it is important to use deployment rings such as Test, Pilot and Broad to prepare for and understand the impact of any change to the environment. An ability to roll back for individual users is most welcome. Fortunately, Microsoft have made it easy to switch Windows Copilot on and off on a targeted basis.
✅ Prioritise data security by reviewing identity and access policies, using data labelling for sensitive documents, and ensuring awareness of file sharing risks. Do your device management policies need a health check?
✅ Identify areas where you may need external assistance and initiate conversations with technology partners.
🚀 Implementing generative AI into a business is a marathon, not a sprint. Set those expectations now. There are quick wins out there to get hands on with the technology while you get Org ready. Windows Copilot in Windows 11 is one of them Hands on with Windows Copilot.
In this post, I explain my first impressions of Windows Copilot along with some tips for getting started with it.
Introduction
On 26th September 2023, Microsoft released optional update KB5030310, one of the most ground breaking updates to Windows in recent times. With it comes Windows Copilot, which for millions of users worldwide will serve as an introduction to using an AI powered chat interface to enhance their day to day productivity.
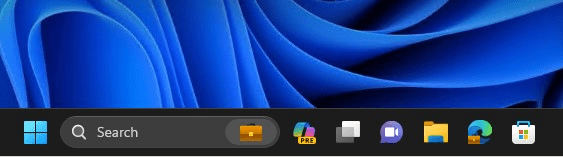
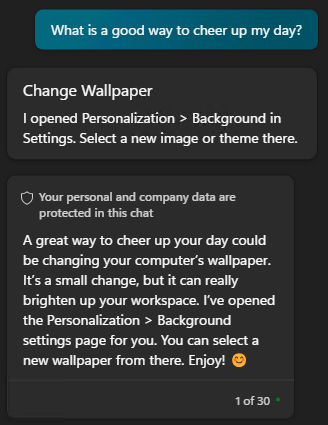
Once installed, the Windows Copilot Preview icon appears in the taskbar.
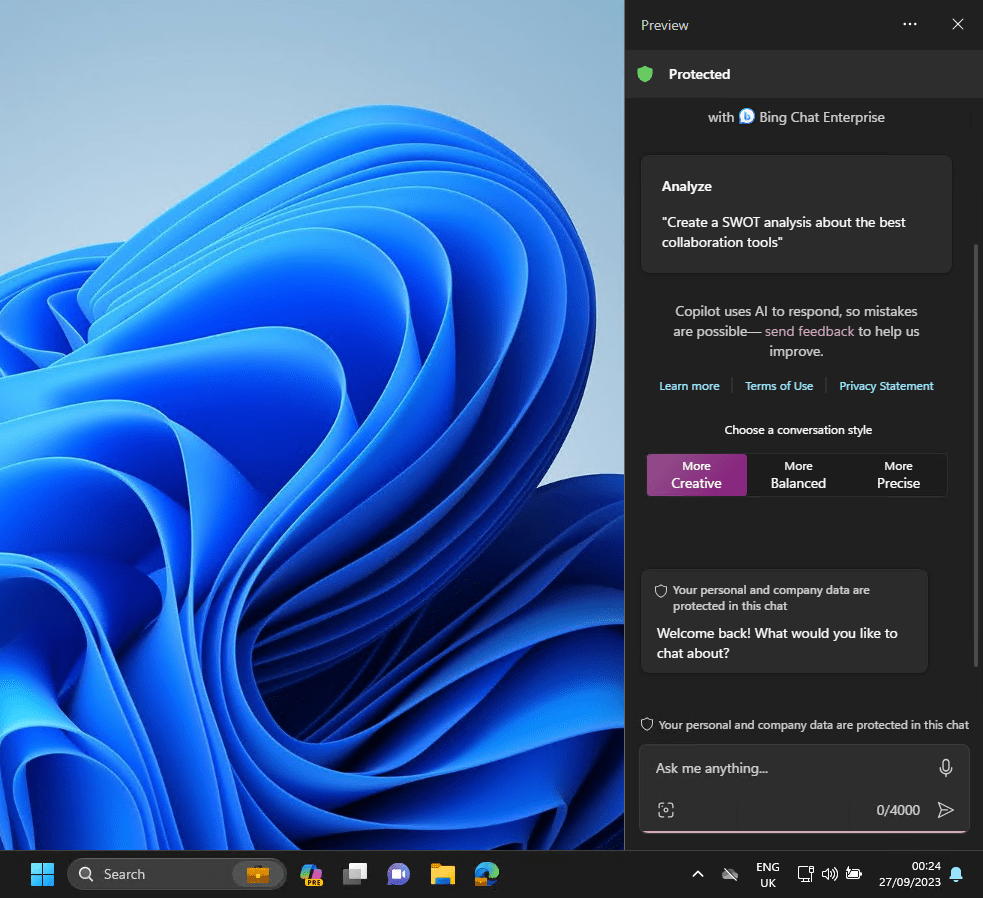
Clicking the Copilot icon opens the full vertical length chat interface.
The screenshot above was taken while logged in on an Azure AD joined device that had Bing Chat Enterprise enabled. This is what the Protected green shield at the top signifies.
Changing Device Settings
Frist things first. Settings in Windows are buried all over the place. Copilot helps by you simply telling it what you want to do. Copilot will respond with a question with Yes and No thanks buttons. In the video below, I ask it to set Windows to the light theme.
Compound Task
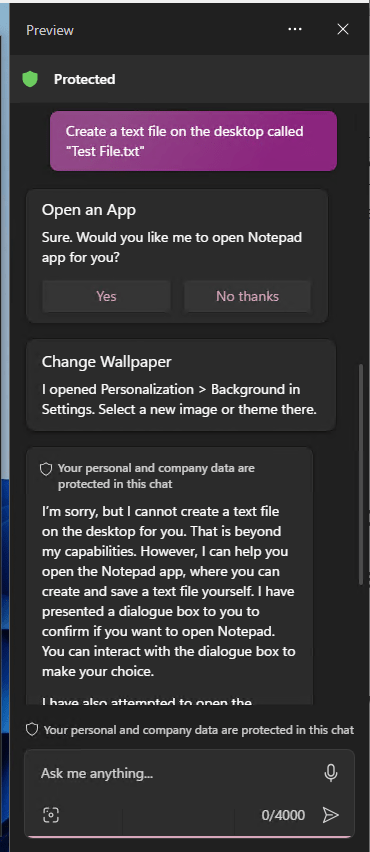
Trying something more advanced, I asked it to create a text file on the desktop. It offered to open Notepad for me and apologised for not being able to perform the end to end task itself. It also opened the Desktop Background settings window in case I wanted to change the theme.
Getting advice for troubleshooting
Telling Copilot that my workstation was slow it presented me with a couple of options to get started. First were Yes/No questions for opening Task Manager or opening ‘a troubleshooter’. It followed that with some guidance text.
A bit of a fail though was that clicking ‘open a troubleshooter’ failed saying that the Get Help app wasn’t installed!
Summarising a Web Page
Let’s get to the really clever stuff. Windows Copilot integrates with Bing Chat (Bing Chat Enterprise if its enabled in your Azure tenant). This brings some cool features. In the video below I am browsing the United States Constitution, a large document. Copilot summarises this in a concise manner.
I found that asking it to summarise the Wikipedia page of The River Thames or the recent amendments to an IEEE standard resulted in it largely regurgitating verbatim what was on the web page.
I think this feature will work best when not attempting to summarise highly technical documents (the IEEE standard) or indeed, text that is already very concise like the Wikipedia page.
Simply typing summarise this page sometimes did not trigger the Edge integration, instead it described what the Copilot window was for. Typing summarise this web page seemed to always work.
The first time you try to use the Copilot > Edge integration, you will need to give permission to share Edge browser content with Copilot when it prompts you.
Integration with Bing Search
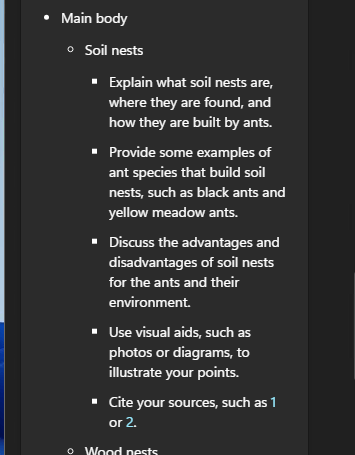
We have had search bars in Windows for many years. Copilot however binds the advanced understanding that AI can bring. Here I asked it to provide an outline for a 15 minute presentation about ant nesting habits and to include reference articles. It provided links to sources for the facts in the presentation. A small section is below:
Images and Snipping Tool
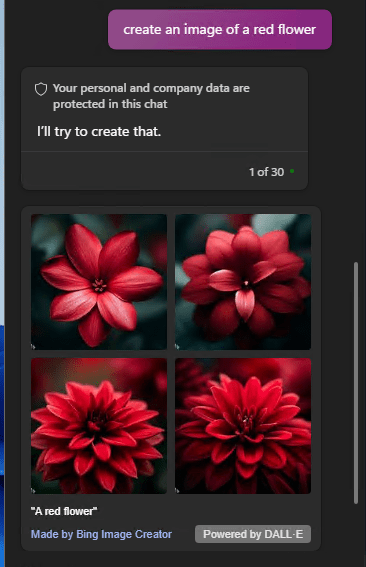
Bing’s AI image creation service, powered by DALL-E, is accessible via Copilot. Just ask it to create any image and off it goes.
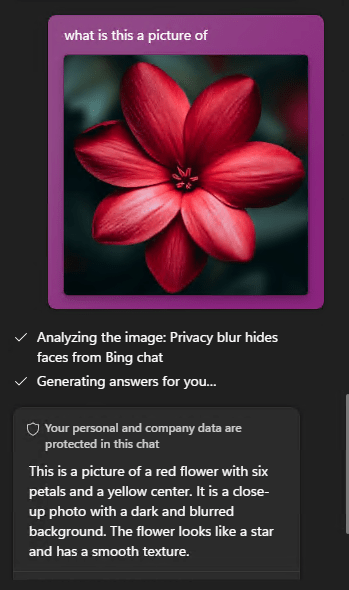
When you use the Snipping Tool, Copilot will ask if you want to add the image to the chat. You can ask Copilot about the image.
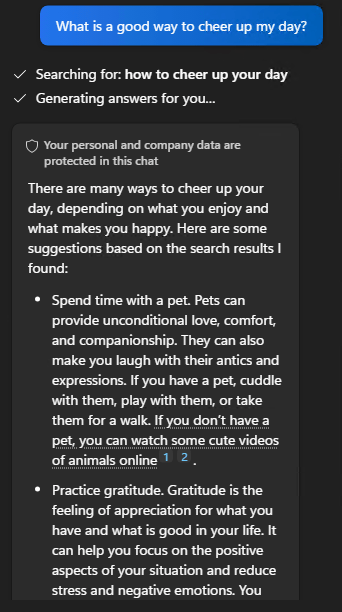
Choosing Conversation Style
You have probably realised by now that Copilot is quite wordy. It defaults to a conversational style which will help many users who are new to Copilot. When you want to get to the point though, you can change from More Creative (purple) to More Balanced (blue) or More Precise (teal).
Below is an example of how this affects the responses. As you can see, if you’re looking for a warm, cuddly bit of chat, don’t turn to More Precise!
Conclusion
Windows Copilot presents the second evolution of Microsoft’s generative AI offering. The first being Bing Chat and the next being Microsoft Copilot. If you are preparing your organisation for Microsoft Copilot, enabling Windows Copilot is a great way to start training users in a new way to command and converse with their computer.
Windows Copilot is useable and versatile even at this early stage in its life. It will develop, for instance there are more integrations with built-in Windows apps that will are slated for phased rollouts soon.
In this post I will describe how to install the Windows Copilot Preview update.
Introduction
On 26th September 2023, Microsoft released optional update KB5030310, one of the most ground breaking updates to Windows in recent times. With it comes Windows Copilot, which for millions of users worldwide will serve as an introduction to using an AI powered chat interface to enhance their day to day productivity.
Now lets walk through how you can get your hands on it.
Prerequisites
A device running Windows 11 22H2.
An environment that allows you to manage your Windows Update settings (some corporate networks prevent users from doing this by restrictive policies).
Installing Windows Copilot Preview
The process requires a reboot
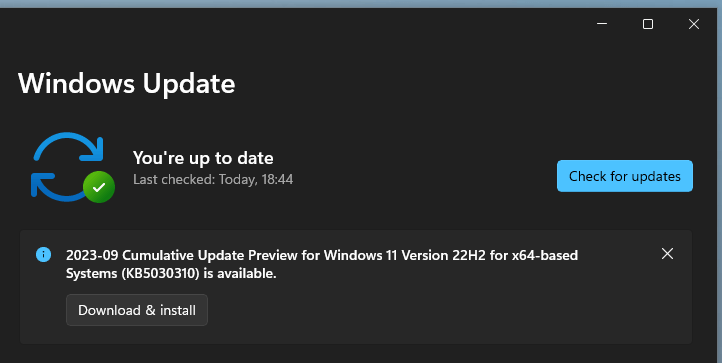
From the Desktop select Start > Settings > Windows Update.
Turn on Get the latest updates as soon as they’re available.
Enabling preview features may reveal additional features unrelated to Windows Copilot. I recommend only doing this on test devices.
Select Check for Updates.
The update “2023-09 Cumulative Update Preview for Windows 11 Version 22H2 for x64-based Systems (KB5030310)” will appear.
It is possible to install the update without enabling Get the latest updates as soon as they're available however, Windows Copilot will be hidden.
If you don’t see the update, try selecting Advanced options > Optional updates.
Install the update.
Reboot the device.
Login and wait for the Desktop to load. You will now see the Copilot Preview icon
Select the icon and you will be presented with Windows Copilot! Enjoy!
The screenshot above was taken while logged in on an Azure AD joined device that had Bing Chat Enterprise enabled. This is what the Protected green shield at the top signifies.
Summary
Welcome to a new way of commanding your device. As you can see, it is easy to install the preview. When Windows 11 23H2 is released in Q4 2023, Windows Copilot will be enabled by default. Check out Microsoft’s 2 minute video overview of features in this update:
In 2022, Microsoft added the Universal Print policy CSP to the Intune settings catalog. This replaced the Universal Print Printer Provisioning Tool and brought about a significant time saving when configuring Universal Print deployment policies.
When the Intune policy is sync’d with a device and a user logs in, the upprinterinstaller.exe runs to set up the printer for the user. Unfortunately, this does not run silently, instead displaying a popup for the user as pictured below:
My testing showed that this occurs on both Windows 10 and Windows 11 (edit 31st July 2024: Microsoft say they have fixed this in Windows 11 but I have not tested this since then). Each printer you deploy gets its own individual popup. So if you are deploying lots of printers, expect to see lots of popups. Combining multiple printers in to a single policy did not reduce the number of popups.
They stay on the screen for between 2 to 20 seconds depending on the device’s resource load. I’ve found that when I’ve misconfigured the deployment settings, the popup stays for up to a minute before exiting (presumably timing out).
In all instances, no user interaction is required. It always closes itself and no messages are displayed on the popup other than the .exe name.
Back in November, Microsoft acknowledged this popup as an issue they are investigating but have not provided any further update. It still does not feature on the Universal Print known issues list.
In this post I will cover what Windows Sandbox is, why it is still a valuable tool and how to get started with it.
Overview
I’ve been speaking to a number of IT professionals and many have either never used Windows Sandbox or even heard of it.
Microsoft introduced the Windows Sandbox feature in Windows 10 1903, so it has been around for quite a while. Microsoft sought to overcome the issue of how you quickly test software on a device without the need to buy a second workstation or deploy Virtual Machines.
Windows Sandbox is a Virtual Machine with a twist.
When it boots it creates a a sandboxed Windows environment.
It securely reads many of the host’s system files to support the VM.
When you shut it down, it destroys itself. Leaving nothing behind.
You can copy and paste to it and it has internet access by default.
In the most recent Windows 11 builds, you can now restart the Sandbox and it will retain its state. Shutting it down still destroys the VM.
This makes it an ideal tool for quick test and dev work.
Prerequisites
Windows 10 Pro, Enterprise or Education build 18305 or Windows 11 (Windows Sandbox is currently not supported on Windows Home edition)
AMD64 or (as of Windows 11 Build 22483) ARM64 architecture
Virtualization capabilities enabled in BIOS
At least 4 GB of RAM (8 GB recommended)
At least 1 GB of free disk space (SSD recommended)
At least two CPU cores (four cores with hyperthreading recommended)
How to Enable Windows Sandbox
A simple tick box is all that is needed!
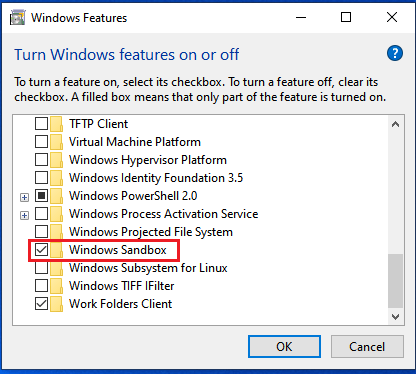
From the Windows desktop, select Start and type “features“
From the results, select Turn Windows features on or off.
Scroll to the bottom of the Windows Features window and tick Windows Sandbox.
When prompted, restart the device.
Explore Windows Sandbox
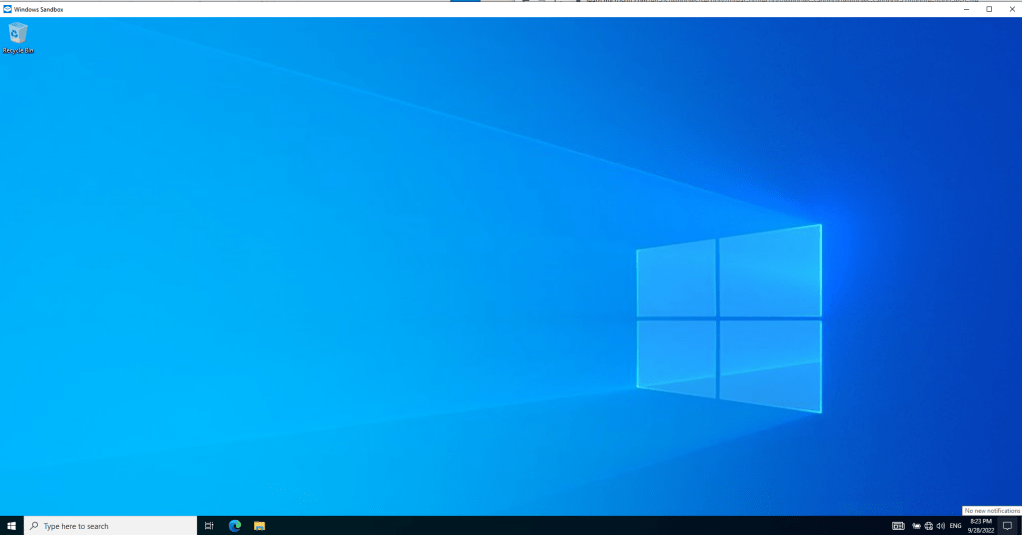
Once enabled and following the restart, you can now find Windows Sandbox in the Start Menu.
Clicking it will launch a brand new virtual machine running Windows. There is no need to login and you already have admin rights.
Out of the box you can:
Browse the internet (keep in mind, you can also browse the local network!)
Copy and Paste through the console
Run Powershell and Powershell ISE consoles
Install software
You cannot:
Update Windows
Make any persistent changes
Turn Windows features on or off
Browse the Microsoft Store
Add additional disks to compliment the 40GB system disk.
Note: The VM shares some system files with the host Operating System. Although the Settings app may show an older feature update of Windows in use (in Windows 10 it says 2004), in fact it is running whichever feature update version you currently have. See point number 2 in the comment below from Paul Bozzay, a Microsoft developer familiar with Windows Sandbox:
Save the file with a name of your choice and with the file extension .wsb
For example: Sandbox-8GB-NoNetworking.wsb
You will notice that the file icon will change to the Windows Sandbox icon as long as Windows Sandbox has been enabled.
Open the file to boot a Windows Sandbox VM with 8GB memory and networking disabled.
To close it, select the X at the top right or shut down the VM via the Start Menu within the VM itself.
Conclusion
Windows Sandbox provides a fast way to test software and is easy to set up. One draw back is that in the Windows 10 version, you cannot test software that requires a restart because restarting will destroy the state of the VM. You can overcome this by using Windows 11’s Windows Sandbox implementation.
If you are using it to test untrusted files then it is important that you understand how the VM interacts with the host Operating System. I recommend reading the Windows Sandbox architecture deep dive from Microsoft here: